
As the sun sets on a vibrant summer evening, the enticing aroma of frying wontons fills the air, sparking a playful curiosity. These Sushi Wonton Cones elevate traditional sushi into a portable delight, perfect for sharing at gatherings or enjoying during cozy nights in. Each crunchy cone is filled with layers of creamy avocado and fresh, sushi-grade tuna, creating a delightful balance that will have your taste buds singing. With their customizable fillings, they’re not just a party appetizer, but a fun, interactive experience that allows you to get creative in the kitchen. Plus, they’re quick to whip up, leaving you more time to enjoy the company of friends and family. What fillings will you choose for your own Sushi Wonton Cones? Let’s dive into this flavorful journey together!

Why Are Sushi Wonton Cones So Fun?
Crispy, Crunchy Texture: The fried wonton shell provides an irresistible crunch that perfectly contrasts the creamy fillings.
Customizable Creativity: Each cone allows you to unleash your culinary creativity, whether you prefer classic tuna or a spicy shrimp variation.
Quick to Make: Whip these up in no time—perfect for last-minute gatherings!
Impressive Presentation: Their unique cone shape makes for stunning visuals, transforming your appetizer table into a feast for the eyes.
Crowd-Pleasing Delight: Both adults and kids love sushi, making these cones a hit at any event.
Elevate your hosting game and also check out serving suggestions to keep your guests refreshed!
Sushi Wonton Cones Ingredients
Elevate your entertaining with these delightful Sushi Wonton Cones!
For the Wonton Cones
- Wonton wrappers – Provides the crisp, crunchy exterior; consider using egg roll wrappers for a larger size.
- Coconut oil (for frying) – Used to fry the cones to a golden brown, offering a rich flavor; substitute with vegetable oil if preferred.
For the Sushi Rice
- Sushi rice (short-grain, sticky) – Forms the base filling, delivering a slight sweetness; brown rice can be a healthier option but will alter texture.
- Rice vinegar – Seasoning agent for the sushi rice, enhancing flavor without adding calories.
- Sugar – Balances the acidity in the rice seasoning; can be replaced with honey or agave for natural sweetness.
- Salt – Essential for seasoning the sushi rice; use sea salt for a hint of mineral taste.
For the Filling
- Avocado – Adds creaminess and healthy fats; substitute with cream cheese for a different flavor.
- Tuna steak (sushi-grade) – Provides lean protein and depth of flavor; other seafood like salmon or shrimp can be used for variation.
- Kewpie mayonnaise – Enhances the tuna mixture with creaminess and umami; regular mayonnaise is a suitable substitute.
- Tomato ketchup or sauce – Adds sweetness and color to the filling.
- Sriracha – Optional for additional heat; can be omitted for a milder flavor.
- Lime zest – Brightens flavor and adds aromatic complexity; lime juice can be used, but the zest has a more intense flavor profile.
For Garnishing
- Furikake or black sesame seeds – For garnish, adding flavor and visual contrast; perfect for making your Sushi Wonton Cones stand out!
Dive into these ingredients and let your imagination flow as you create your own versions of Sushi Wonton Cones!
Step‑by‑Step Instructions for Sushi Wonton Cones
Step 1: Prepare the Oil for Frying
In a deep pan, heat coconut oil to 175 °C (350 °F) over medium heat. Use a thermometer to ensure the temperature is accurate, as this will create the perfect environment for frying. You’ll know it’s ready when the oil starts to shimmer slightly. This crisp frying experience is crucial for achieving golden, crunchy Sushi Wonton Cones.
Step 2: Form the Wonton Cones
Take wonton wrappers and gently wrap them around cream horn molds, pressing firmly to seal the edges. Ensure there are no gaps, as this will help maintain the shape during frying. Arrange the wrapped molds on a plate, ready to be fried to a crispy perfection. Visualize your future cones filled with deliciousness!
Step 3: Fry You Wonton Cones
Carefully lower the wrapped cones into the hot oil and fry for about 3-5 minutes. Turn them occasionally with tongs to ensure they cook evenly and become a lovely golden brown. Keep an eye on them, as they can go from perfect to burnt quickly. Once done, remove the cones and set them aside on paper towels to absorb excess oil.
Step 4: Prepare the Sushi Rice
While the cones cool, rinse sushi rice until the water runs clear, then cook according to package instructions until sticky. Once cooked, mix in rice vinegar, sugar, and salt while still warm. This seasoning adds a delightful depth to the rice, ensuring each bite of your Sushi Wonton Cones is filled with flavor. Allow the rice to cool to room temperature before filling the cones.
Step 5: Make the Tuna Filling
Finely flake or cube sushi-grade tuna and combine it with Kewpie mayonnaise, tomato ketchup, sriracha, and fresh lime zest in a bowl. Mix well until everything is evenly distributed, creating a creamy and savory filling that perfectly complements the crunchy texture of the fried shells. Be ready to fill your cones with this tasty tuna mixture!
Step 6: Assemble the Sushi Wonton Cones
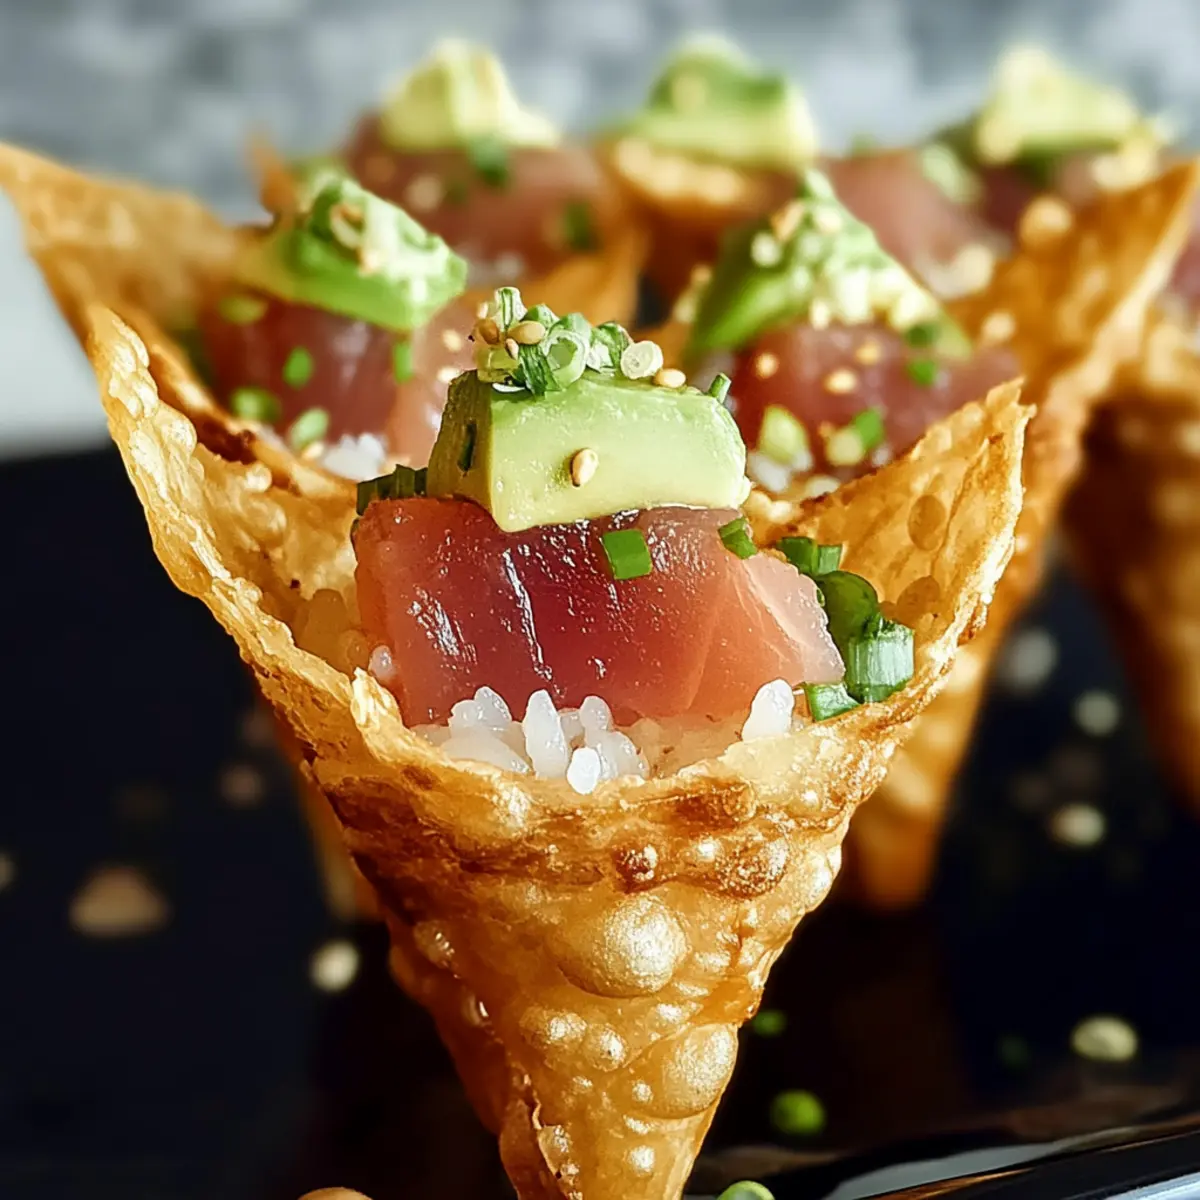
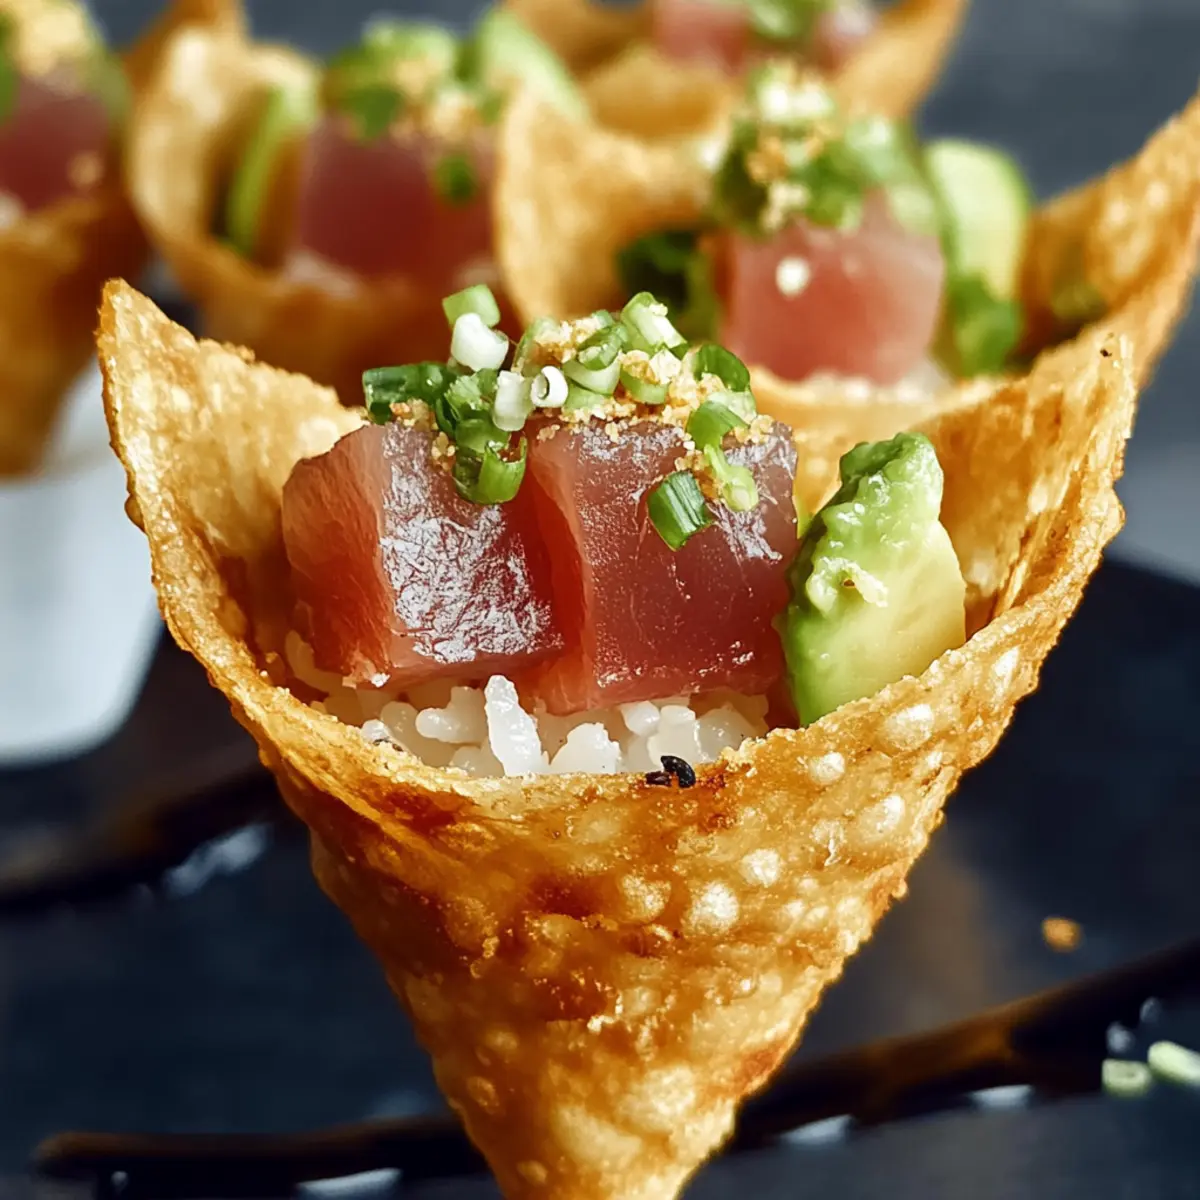
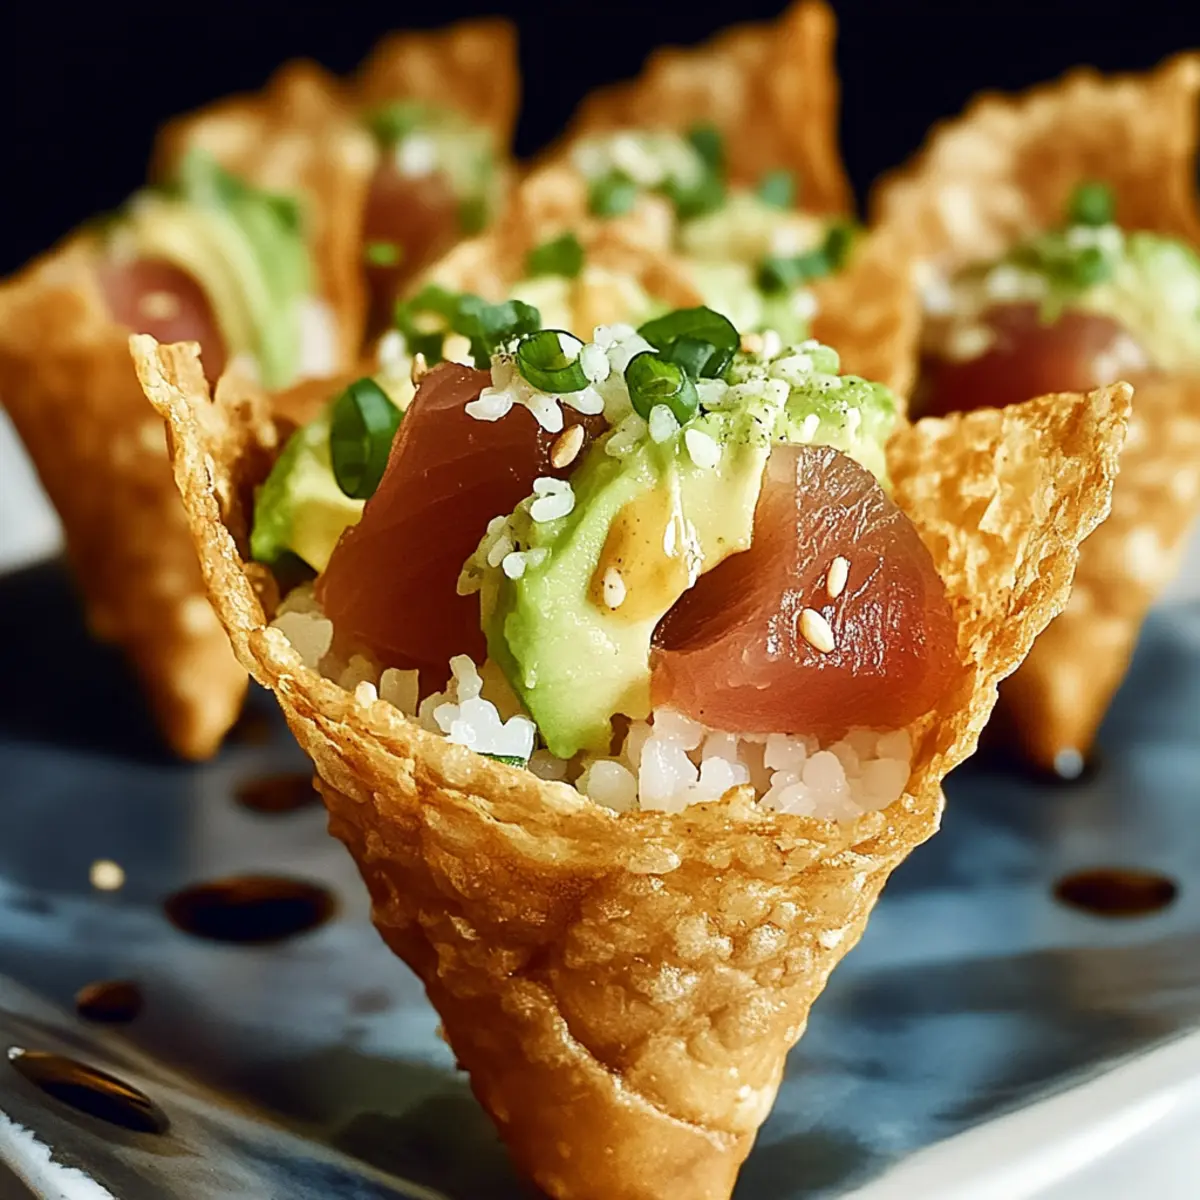
Begin filling each cooled wonton cone with a layer of the seasoned sushi rice. Follow this by adding slices of creamy avocado, ensuring a smooth layer that complements the cone’s crunch. Finish by carefully spooning in the luscious tuna filling, creating a layered effect. As you assemble, let your creativity shine with the arrangement!
Step 7: Garnish and Serve
To make your Sushi Wonton Cones pop, sprinkle them with furikake or black sesame seeds right before serving. This not only adds visual appeal but also enhances flavor. Arrange the cones upright in a mini muffin tin or foam block for a stunning presentation. Now, your snacks are not only delicious but also a feast for the eyes!
What to Serve with Sushi Wonton Cones
When hosting a gathering, complementing your delicious Sushi Wonton Cones with the right sides and drinks enhances the entire experience.
- Crispy Vegetable Spring Rolls: These are light and crunchy, providing a fresh vegetable contrast that works beautifully alongside the rich filling of your cones.
- Cucumber-Mint Salad: A refreshing salad with a zesty dressing, it adds a cooling touch that balances the savory flavors of your sushi cones.
- Iced Green Tea: This light, subtly sweet beverage pairs perfectly, cleansing the palate between delightful bites of your handheld snacks.
- Miso Soup: Warm and comforting, miso soup adds a traditional Japanese element that perfectly complements your sushi-inspired dish.
- Teriyaki Chicken Skewers: Tender, glazed chicken skewers present an irresistible savory option that pairs well with the oceanic flavors of the cones.
- Pickled Ginger: Served as a side, it not only offers a pop of color but also enhances flavors and aids digestion, keeping the meal light and enjoyable.
- Spicy Edamame: Tossed in chili flakes, these vibrant pods add a fun, spicy twist, making them a perfect munching companion to the cones.
- Sesame Noodle Salad: Nutty, savory, and satisfying, this salad serves as a hearty counterpoint to the lightness of the Sushi Wonton Cones.
- Sake or Cucumber-Mint Lemonade: Offer sake for a traditional drink pairing or a refreshing cucumber-mint lemonade for a fun, non-alcoholic alternative!
Expert Tips for Sushi Wonton Cones
Frying Temperature: Maintain the oil temperature at 175 °C (350 °F) to ensure the cones are crispy. Too hot and they burn, too cool and they become soggy.
Proper Wrapping: Ensure the wonton wrappers are tightly sealed around the molds. Any gaps can cause oil to seep in and ruin the crunchy texture of your Sushi Wonton Cones.
Rice Cooling: Allow the sushi rice to cool to room temperature before filling. This prevents the cones from getting soggy and helps maintain their delightful crunch.
Avoid Overstuffing: Fill each cone with a manageable amount of filling. Overloading can make them difficult to handle and eat, taking away the joy of enjoying these delightful sushi-inspired treats.
Presentation Tip: For stunning visuals, display your cones upright in a mini muffin tin or foam block. This not only showcases their beautiful layers but also makes them easy to grab for your guests!
Make Ahead Options
These Sushi Wonton Cones are perfect for meal prep enthusiasts, allowing you to save time without sacrificing flavor! You can prepare the wonton cones and fry them up to 24 hours in advance, ensuring a crisp texture by storing them in an airtight container at room temperature. Additionally, mix the sushi rice and tuna filling ahead of time; they can be refrigerated for up to 3 days. When you’re ready to serve, simply fill the cooled cones with sushi rice, creamy avocado, and the flavorful tuna mixture for a delightful handheld snack. By prepping ahead, you’ll enjoy delicious, restaurant-quality Sushi Wonton Cones with minimal effort, making them an ideal choice for busy weeknights or gatherings!
Sushi Wonton Cones Variations
Feel free to get creative and customize your Sushi Wonton Cones to suit your taste buds!
- Seafood Swap: Use salmon or cooked shrimp instead of tuna for a different flavor profile. The ocean’s bounty offers a fresh twist!
- Vegetarian Delight: Substitute tuna with marinated tofu or tempura vegetables for a delightful veggie option. This creates an equally satisfying texture!
- Spicy Kick: Amp up the heat by adding more sriracha or slicing jalapeños into the filling. Spice lovers will rejoice with this fiery variation!
- Herb Boost: Add chopped cilantro or green onions for a burst of freshness and flavor. These herbs take your fillings to the next level!
- Cream Cheese Alternative: Replace avocado with cream cheese for a rich, tangy contrast. The creaminess pairs beautifully with the flavors of sushi!
- Rice Reboot: Swap sushi rice for quinoa or cauliflower rice for a healthier twist. These alternatives will add a unique texture and flavor.
- Tangy Zest: Incorporate pickled vegetables into your filling for a delightful tang. They will bring brightness and crunch to the mix!
- Nutty Garnish: Finish with crushed peanuts or wasabi peas for a crunchy topping that adds complexity and a touch of fun.
Feel inspired? You can also explore accompanying drinks like cucumber-mint lemonade to enhance your sushi experience!
How to Store and Freeze Sushi Wonton Cones
Fridge: Keep filled Sushi Wonton Cones in an airtight container, where they’ll stay fresh for up to 1 day. To maintain crunchiness, consider storing the filling separately and assembling just before serving.
Freezer: For the best results, freeze the unfilled, fried cones in a single layer on a baking sheet, then transfer to a freezer bag. They can be stored for up to 1 month.
Reheating: To revive the crispy texture, reheat the frozen cones in an oven at 180 °C (350 °F) for about 10-15 minutes until heated through. Avoid microwaving to prevent sogginess.
Preparation Tip: Prepare the sushi rice and tuna filling ahead of time, refrigerating them separately for up to 3 days, so you can quickly assemble your Sushi Wonton Cones when cravings hit!
Sushi Wonton Cones Recipe FAQs
What type of wonton wrappers should I use?
You can use standard wonton wrappers for smaller cones, or if you prefer a larger size, egg roll wrappers work wonderfully as well! Just keep in mind that larger wrappers may need a slightly longer frying time to ensure they become golden and crispy.
How should I store leftover Sushi Wonton Cones?
To maintain the crunch, store filled cones in an airtight container in the fridge for up to 1 day. If you’d like to keep the components fresh longer, store the filling and cones separately and assemble them just before serving. This technique keeps them delightful and crispy!
Can I freeze Sushi Wonton Cones?
Absolutely! To freeze, place unfilled, fried cones in a single layer on a baking sheet to prevent them from sticking together. Once frozen solid, transfer them to a freezer bag where they can be stored for up to 1 month. This way, you can enjoy your delicious cones anytime!
What should I do if my wonton cones become soggy?
If your cones have lost their crispiness, you can easily revive them. Simply reheat the cones in an oven preheated to 180 °C (350 °F) for about 10-15 minutes, until they’re hot and crispy again. Avoid using a microwave as this can lead to sogginess.
Are there any dietary considerations for Sushi Wonton Cones?
Yes! If you’re catering to vegetarian or allergy needs, consider substituting the tuna with marinated tofu or tempura vegetables and use a vegan mayonnaise in place of Kewpie mayonnaise. Additionally, always check for allergy information on your ingredients, especially regarding sushi-grade fish.
How can I customize the fillings for my Sushi Wonton Cones?
The sky’s the limit with customizable fillings! You can swap out the tuna for cooked shrimp or salmon for a different protein. For a spicy kick, add more sriracha to the filling or include diced jalapeños. Feel free to experiment with various garnishes such as microgreens or pickled vegetables to create your unique flavor profile!
Sushi Wonton Cones: Your New Favorite Party Snack
Ingredients
Equipment
Method
- Prepare the Oil for Frying: Heat coconut oil to 175 °C (350 °F) over medium heat.
- Form the Wonton Cones: Wrap wonton wrappers around cream horn molds, sealing edges tightly.
- Fry Your Wonton Cones: Lower the wrapped cones into hot oil and fry for 3-5 minutes until golden brown.
- Prepare the Sushi Rice: Rinse sushi rice until clear, cook, and mix in rice vinegar, sugar, and salt.
- Make the Tuna Filling: Combine flaked tuna with Kewpie mayonnaise, tomato ketchup, sriracha, and lime zest.
- Assemble the Sushi Wonton Cones: Fill cones with sushi rice, avocado, and tuna filling.
- Garnish and Serve: Sprinkle with furikake or black sesame seeds and arrange upright for presentation.
Leave a Reply