
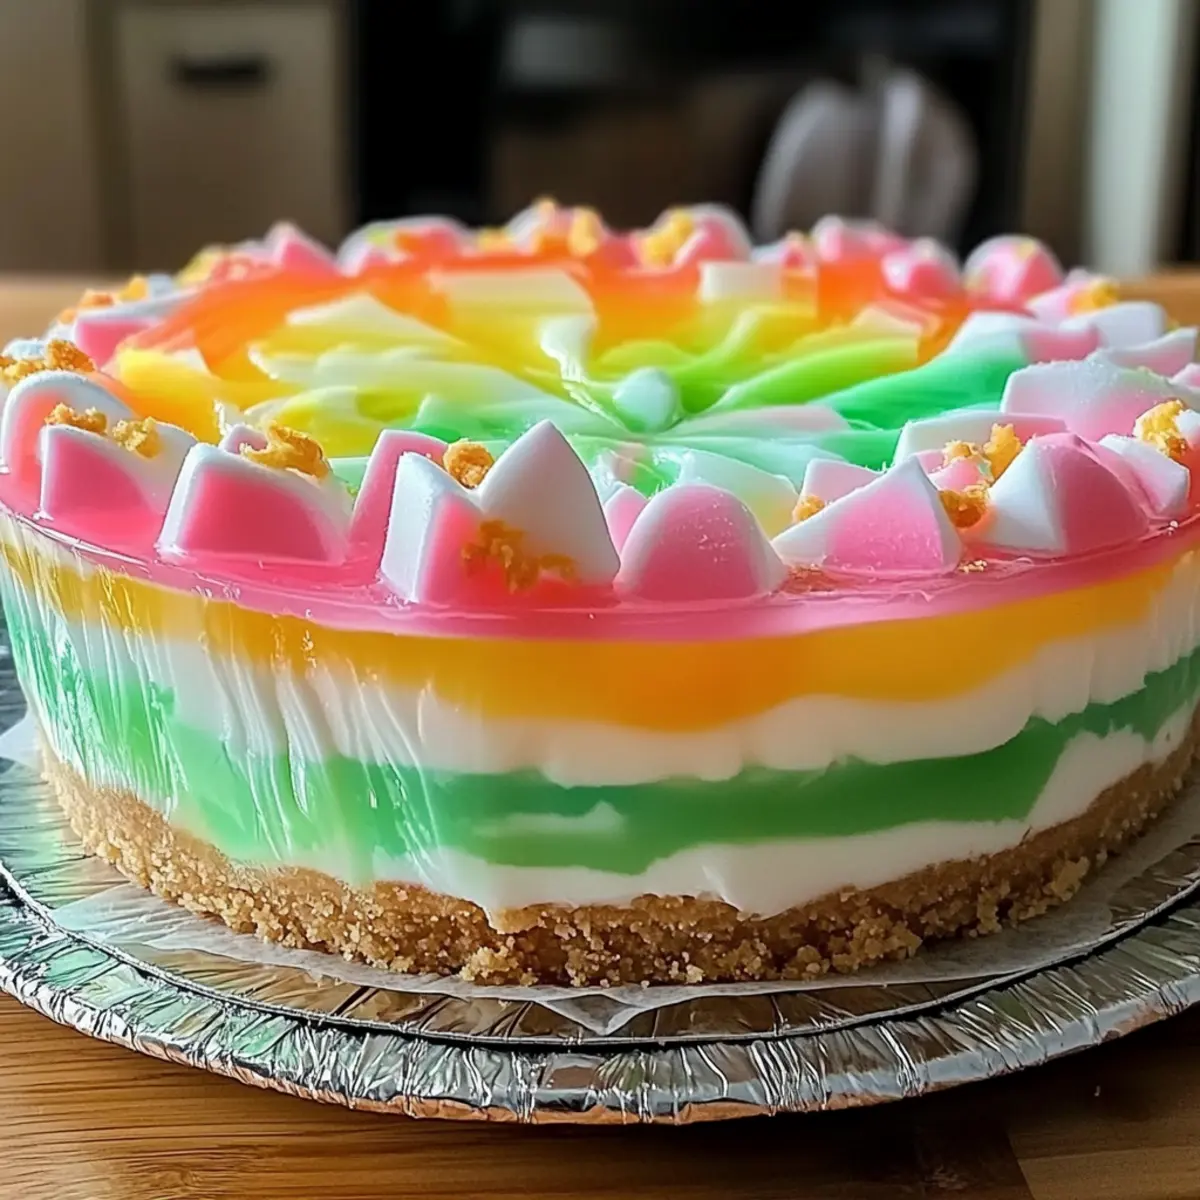
As I stared at the vibrant colors glistening in the bowl, I couldn’t help but feel a wave of nostalgia wash over me. This Easter No-Bake Jello Pie is the perfect way to capture the magic of spring and the joy that comes with it. Easy to make ahead, this dessert offers a delightful combination of sweetened cream cheese and fruity Jello nestled in a crunchy graham cracker crust. Whether you’re looking to impress family or simply want a fuss-free treat to enjoy, this festive pie fits the bill. Not only does it add a pop of color to your holiday table, but it’s also a crowd-pleaser that promises to delight guests of all ages. Ready to dive into a slice of childhood memory? Let’s create this colorful springtime delight together!
Why is this pie a must-try?
Easy Preparation: The no-bake method means you can whip this up in no time, perfect for those busy holiday gatherings.
Vibrant Colors: A feast for the eyes, this pie’s colorful layers bring the essence of spring right to your table.
Crowd-Pleaser: From kids to adults, everyone will be reaching for seconds of this refreshing treat.
Versatile Flavor: Experiment with different Jello flavors to create a unique dessert that matches your party theme.
Make-Ahead Delight: Prepare it in advance, allowing you more time to enjoy your festivities—just like with my Baked Cottage Cheese or Crispy Baked Parmesan Zucchini recipes!
Easter No-Bake Jello Pie Ingredients
For the Crust
• Graham Cracker Crust – This forms the base of your pie, adding a delightful crunch; you can use store-bought for maximum convenience.
For the Cream Cheese Layer
• Cream Cheese – Provides a creamy and rich texture; opt for dairy-free cream cheese for a lighter alternative.
• Granulated Sugar – Sweetens the cream cheese layer perfectly; adjust to taste or substitute with a natural sweetener for a healthier version.
• Vanilla Extract – Adds a hint of warmth and depth to the flavor; a little goes a long way!
For the Jello Layer
• Boiling Water – Activates the gelatin in Jello, which is crucial for the pie to set properly.
• Cold Water – Helps to cool and dilute the Jello after it’s dissolved, ensuring a smooth layer.
• Jello (Various Flavors and Colors) – The star of the show! Choose vibrant Jello flavors that evoke the spirit of spring to match your festive table.
For the Topping
• Whipped Topping – Adds a light and fluffy finish; consider using a dairy-free variety if needed.
• Optional Easter Candies or Sprinkles – For a touch of festive flair, sprinkle these on before serving to enhance the visual appeal!
With these ingredients, you’re on your way to creating a stunning Easter No-Bake Jello Pie that’s sure to impress!
Step‑by‑Step Instructions for Easter No Bake Jello Pie
Step 1: Prepare the Cream Cheese Layer
In a large mixing bowl, beat the cream cheese with granulated sugar and vanilla extract using an electric mixer until the mixture is smooth and creamy, about 2-3 minutes. This creamy layer provides a delicious base for your Easter No Bake Jello Pie. Make sure there are no lumps for a velvety texture.
Step 2: Prepare the Jello Layer
In a separate bowl, dissolve one package of Jello powder in 1 cup of boiling water, stirring continuously until fully dissolved, which should take about 2 minutes. This step is crucial as it activates the gelatin, creating the wobbly texture of your pie’s layers. After dissolving, stir in ½ cup of cold water to cool the mixture slightly.
Step 3: Cool the First Jello Layer
Allow the Jello mixture to cool at room temperature for about 10 minutes, then carefully pour it into your prepared graham cracker crust. The crust should be stable and ready for the layers. This initial layer will be beautiful and bright; let it set before the next step.
Step 4: Chill the First Jello Layer
Refrigerate the pie with the first Jello layer for about 1-2 hours, or until firm to the touch. You want to ensure that it’s set well, so it doesn’t mix with the cream cheese layer. Check that the Jello feels slightly wobbly but not liquid.
Step 5: Spread the Cream Cheese Layer
Once the Jello layer has set, take it out of the refrigerator and spread the cooled cream cheese mixture evenly over the top, smoothing it out with a spatula. This layer adds a delightful creaminess to your Easter No Bake Jello Pie and should be spread gently to avoid mixing with the Jello below.
Step 6: Chill the Cream Cheese Layer
Return the pie to the refrigerator and let the cream cheese layer chill for an additional 30 minutes. This helps to firm it up, making the next Jello layer easier to pour without disturbing the cream cheese layer. Check that it’s set and ready for the finishing touches.
Step 7: Prepare and Pour the Second Jello Layer
Repeat the process for the second layer by mixing another package of Jello powder in 1 cup of boiling water and then adding ½ cup of cold water. Allow this Jello mixture to cool for about 10 minutes and then gently pour it over the cream cheese layer, making sure not to disturb it.
Step 8: Chill the Pie Completely
Place the pie back in the refrigerator and let it chill for at least 4 hours or overnight, allowing all layers to set completely. This is key for achieving that perfect slice! When it’s ready, the final layer should wobble just slightly as a whole.
Step 9: Decorate and Serve
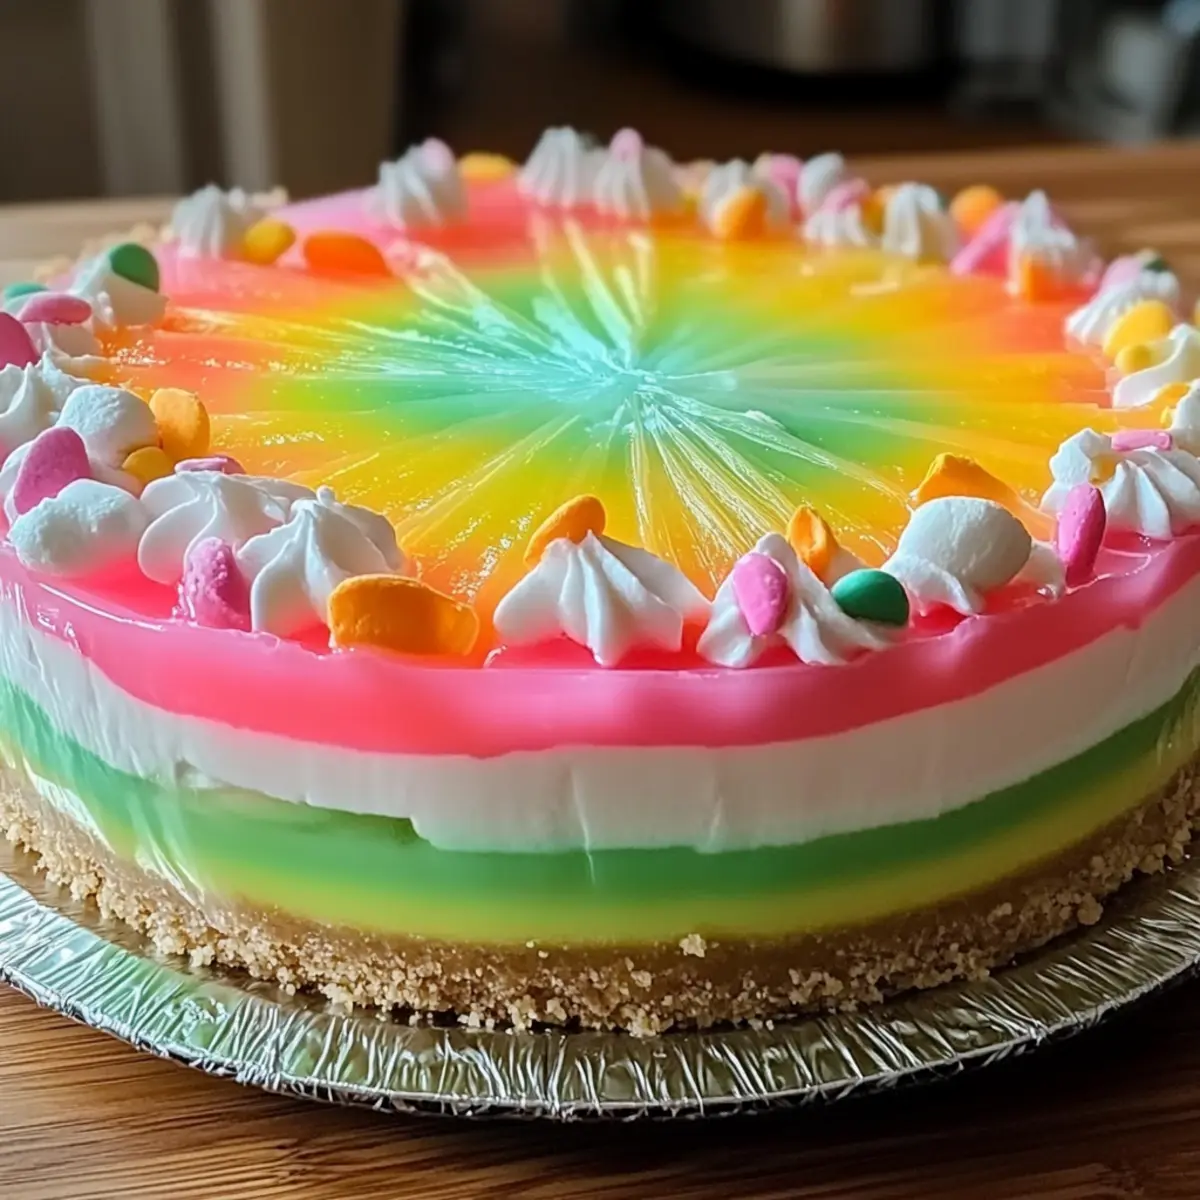
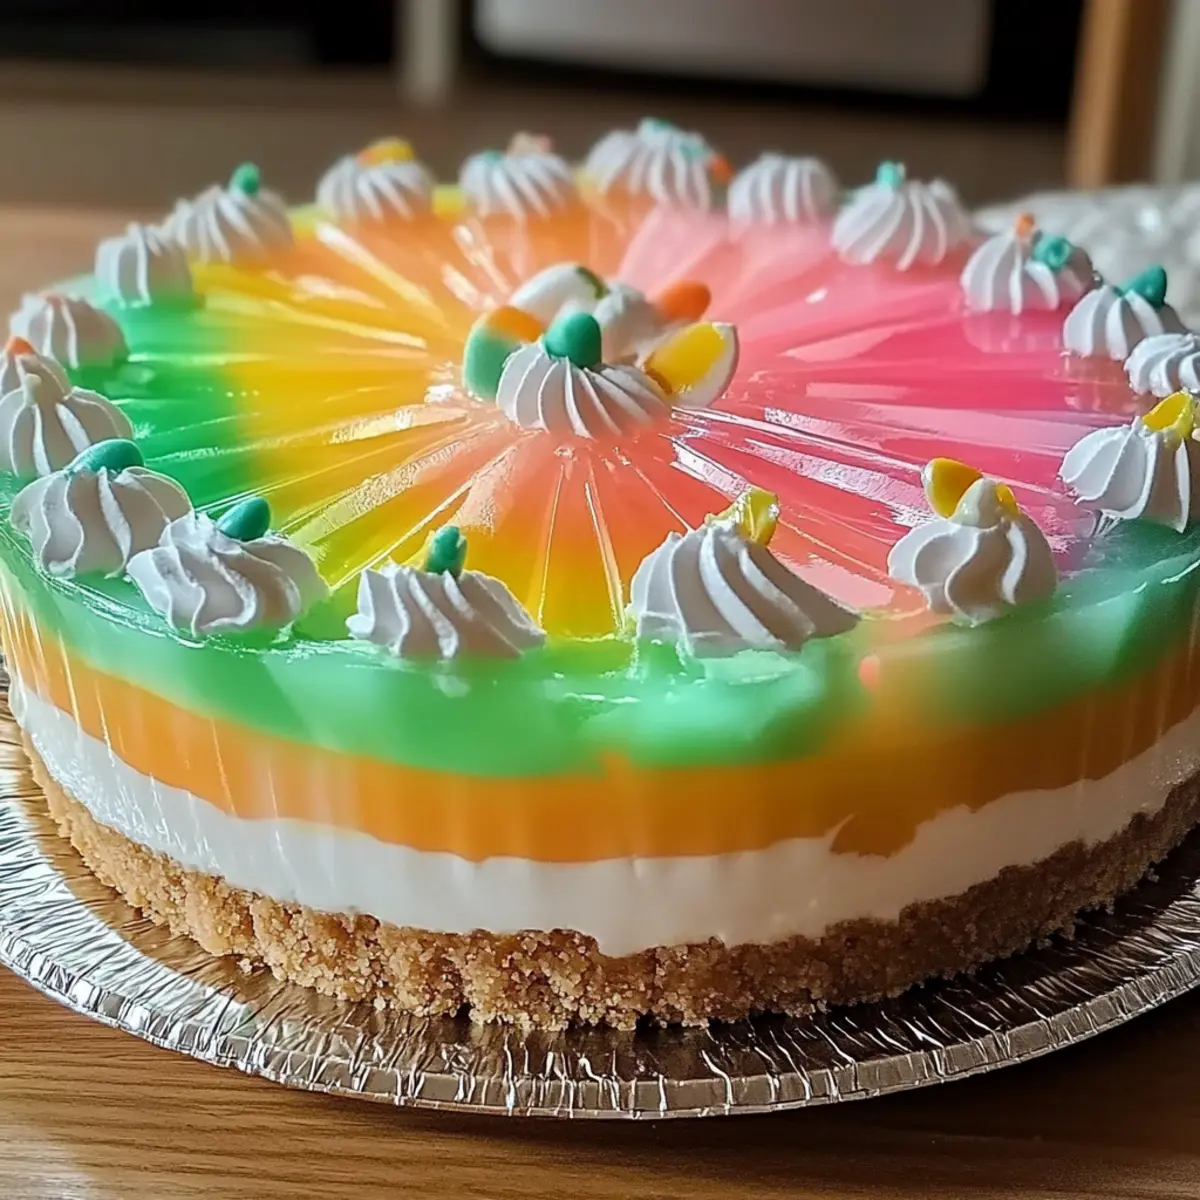
Before serving your beautiful Easter No Bake Jello Pie, top it with a layer of whipped topping, and feel free to add some colorful Easter candies or sprinkles for a delightful finishing touch. This vibrant decoration enhances the festive spirit, ready to brighten your holiday gathering!

Storage Tips for Easter No-Bake Jello Pie
-
Refrigerator: Store the pie in an airtight container to keep it fresh for up to 3-4 days. This way, you can enjoy delightful leftover slices without losing the vibrant texture.
-
Freezer: Avoid freezing the Easter No-Bake Jello Pie, as it can alter the texture upon thawing. It’s best enjoyed fresh, maintaining its delightful layers!
-
Serving Leftovers: When ready to serve leftovers, simply slice the desired amount and enjoy them chilled. If the toppings have softened, you can add a bit more whipped topping for a refreshing touch.
Expert Tips for Easter No-Bake Jello Pie
-
Cool Jello Properly: Allow the Jello to cool for at least 10 minutes before adding it to the crust to prevent melting the cream cheese layer.
-
Be Patient: Ensure each layer is adequately chilled before adding the next; this ensures a beautiful, intact pie when sliced.
-
Check Gelatin Activation: Make sure to dissolve the Jello completely in boiling water for a perfectly set layer; any lumps can ruin the texture of your Easter No-Bake Jello Pie.
-
Customize Colors: Feel free to mix different flavors and colors of Jello to create a more colorful, festive dessert that reflects the spirit of spring.
-
Storage Matters: Keep leftovers in an airtight container in the refrigerator for up to 3-4 days to maintain freshness without compromising texture.
Make Ahead Options
Preparing the Easter No-Bake Jello Pie in advance is a fantastic time-saver for those busy holiday festivities! You can make the crust and cream cheese layer up to 24 hours ahead, storing them tightly wrapped in the refrigerator to maintain their freshness. Additionally, the first layer of Jello can be prepared and set a day prior; simply refrigerate until it’s firm. When you’re ready to serve, just spread the cream cheese mixture on top and complete the final Jello layer. After chilling the assembled pie for at least 4 hours or overnight, it will be just as delightful for your guests, giving you more time to enjoy the celebration!
What to Serve with Easter No-Bake Jello Pie
Bring a splash of color and flavor to your holiday feast with perfect side dishes to accompany this delightful dessert.
-
Fresh Fruit Salad: A medley of seasonal fruits offers a refreshing contrast that complements the pie’s sweetness, adding a vibrant touch to your table.
-
Light Cheesecake Bars: Creamy and smooth, these bars echo the sweetness of the pie and provide a delicious texture balance without being overly heavy.
-
Spring Green Salad: Crisp greens with a tart vinaigrette add a burst of freshness to the meal, enhancing the festive feel and cutting through the pie’s creamy richness.
-
Lemonade or Iced Tea: These classic beverages are perfect for quenching thirst while their citrus notes pair beautifully with the fruity flavors of the Jello pie.
-
Chocolate-Dipped Strawberries: A playful treat that adds a touch of decadence to your dessert plate, they offer a delightful flavor contrast to the lightness of the pie.
-
Mini Cupcakes: Light and fluffy cupcakes can serve as an adorable dessert diversion, allowing guests to indulge in a variety of flavors while maintaining a festive atmosphere.
Easter No Bake Jello Pie Variations
Feel free to let your creativity shine by customizing this delightful dessert to suit your taste buds!
-
Flavor Fusion: Experiment with various Jello flavors like strawberry and lime for a fun twist. Combining different flavors not only enhances taste but also adds a vibrant look!
-
Cookie Crust Upgrade: Swap the graham cracker crust for an Oreo cookie crust for a sweet, chocolatey surprise that pairs perfectly with fruity Jello. It’s a delicious way to add depth to your dessert.
-
Dairy-Free Delight: Use dairy-free cream cheese and whipped topping to make this dessert vegan-friendly while still enjoying that creamy texture everyone loves. Your plant-based guests will appreciate the thought!
-
Natural Sweeteners: Replace granulated sugar with honey or agave nectar for a wholesome twist. It adds a distinct flavor that complements the cream cheese beautifully.
-
Dress It Up: Consider adding fresh fruit on top, like strawberries or blueberries, for a refreshing burst of flavor. Fruits not only taste great but also make your pie look inviting and festive.
-
Spice It Up: If you crave a little heat, mix in some crushed red pepper flakes into the cream cheese layer for a surprising kick against the sweetness. It’s an unexpected and delightful contrast!
-
Allergy-Friendly Version: For nut allergies, check your toppings and your crust to ensure they’re safe. There are many nut-free crust options available, keeping your dessert accessible for everyone.
-
Colorful Layers: Use neon or pastel Jello to play up the festive feel, making your pie as vibrant as an Easter egg hunt. Experimenting with colors can turn this dessert into a showstopper at any gathering!
With these variations, make this Easter No-Bake Jello Pie your own! You might find inspirations for other family favorites while you’re at it, like my delightful Baked Cauliflower Steaks or comforting Cheddar Bay Pie.
Easter No-Bake Jello Pie Recipe FAQs
How do I choose the right Jello flavors and colors?
Absolutely! When selecting Jello for your Easter No-Bake Jello Pie, opt for vibrant colors that match the festive spirit of spring. Mix different flavors like strawberry, orange, or lime for a colorful rainbow effect. You can also consider seasonal flavors to identify a unique taste combination that resonates with your celebration!
How should I store leftovers of the pie?
Very! To keep your Easter No-Bake Jello Pie fresh, store it in an airtight container in the refrigerator for up to 3-4 days. This ensures that the layers remain intact and the flavors are preserved. Make sure to cover the pie well, as this prevents it from absorbing any odors from the fridge.
Can I freeze the pie for later use?
No, it’s best to avoid freezing the Easter No-Bake Jello Pie, as it can compromise the texture of the layers upon thawing. The whipped topping can lose its fluffiness, and the Jello might become a bit watery. Enjoy it fresh for the best experience!
What should I do if the Jello won’t set properly?
If your Jello layer doesn’t set properly, it may be due to not dissolving it thoroughly in boiling water. Make sure to mix well and allow it to cool adequately before layering. If it’s still wobbly after chilling, you might need to start over. Follow the instructions carefully and ensure you allow each layer to set before adding the next!
Can I make dietary substitutions in this recipe?
Absolutely! Feel free to use dairy-free cream cheese or whipped topping to cater to allergies or dietary preferences. Additionally, consider using sugar alternatives in the cream cheese layer for a lower-sugar version. The beauty of this Easter No-Bake Jello Pie is its versatility, accommodating various dietary needs while keeping all its festive charm!
How long can I let the pie chill in the refrigerator?
I often recommend letting your pie chill overnight for the best results. However, if you’re short on time, chill it for a minimum of 4 hours after adding all layers. The longer it sets, the better the texture, ensuring that each slice holds perfectly when served.
Easter No Bake Jello Pie: A Fun, Colorful Festive Treat
Ingredients
Equipment
Method
- In a large mixing bowl, beat the cream cheese with granulated sugar and vanilla extract using an electric mixer until smooth, about 2-3 minutes.
- In a separate bowl, dissolve Jello powder in boiling water, stirring continuously until fully dissolved, about 2 minutes. Stir in cold water.
- Allow the Jello mixture to cool at room temperature for about 10 minutes, then carefully pour it into the prepared graham cracker crust.
- Refrigerate with the first Jello layer for about 1-2 hours, or until firm.
- Spread the cooled cream cheese mixture evenly over the cooled Jello layer.
- Return to the refrigerator and let the cream cheese layer chill for 30 minutes.
- Repeat the process for the second layer by mixing another package of Jello in boiling water and adding cold water. Cool and gently pour over the cream cheese layer.
- Chill the pie completely for at least 4 hours or overnight.
- Before serving, top with whipped topping and colorful candies or sprinkles.
Leave a Reply