
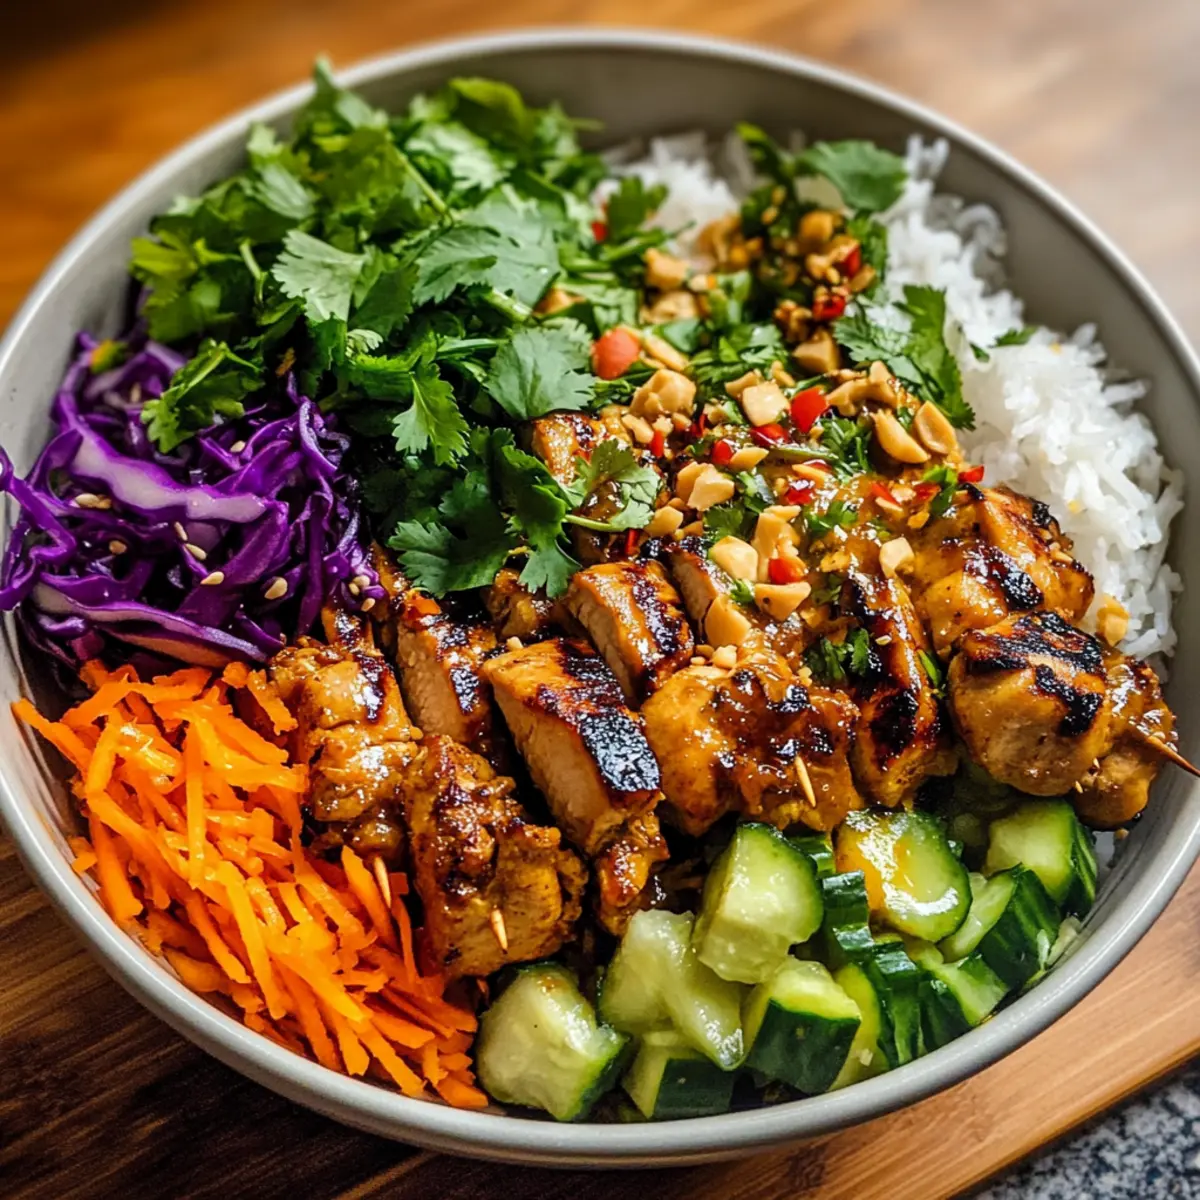
As I savored the vibrant colors and aromatic spices dancing in front of me, I knew I had just discovered a keepsake from my culinary adventures: Chicken Satay – Spring Roll Bowls. This dish masterfully combines tender, marinated chicken with a fresh, crunchy salad, creating a refreshing escape from mundane weeknight meals. Not only are these bowls meal-prep friendly, but they’re also a protein-packed delight that will leave your family buzzing with excitement! With the ability to customize each component to suit your taste, you can effortlessly impress guests or whip up a quick dinner. Who knew healthy could taste so downright delicious? Let’s dive into this flavor-packed journey together!
Why is Chicken Satay the Perfect Dish?
Elevated Flavor: The marinated chicken thighs, infused with garlic, ginger, and a hint of curry, create a mouthwatering taste that’s hard to resist.
Visual Appeal: This dish is a feast for the eyes, presenting a vibrant array of fresh vegetables and aromatic herbs.
Customizable Goodness: Feel free to switch up the proteins or base; you can enjoy everything from tofu to cauliflower rice instead of traditional options.
Meal-Prep Friendly: Ideal for busy weeknights, these bowls can be prepped in advance and stored separately for easy assembly.
Healthy Delights: With around 420 calories and 38g of protein per bowl, you can indulge without the guilt!
To spice things up, consider pairing them with a refreshing Chopped Chicken Caesar Wrap or a hearty Fried Chicken Street Taco for a delightful taste adventure!
Chicken Satay – Spring Roll Bowl Ingredients
For the Chicken Marinade
• Chicken Thighs – Juicy and flavorful, perfect for marinating to enhance taste.
• Olive Oil – Keeps the chicken moist during cooking and enhances flavored marinade.
• Garlic (minced) – Adds aromatic depth that elevates the entire dish.
• Ginger Paste – Provides warmth and a hint of spice that pairs well with the other ingredients.
• Low-Sodium Soy Sauce – Infuses umami flavor without excess sodium for a healthier kick.
• Yellow Curry Powder – Contributes an earthy and warm spice typical of Southeast Asian cuisine.
• Ground Turmeric – Adds vibrant color and numerous health benefits.
• Ground Coriander – Brings a fresh, citrusy note to the marinade.
• Chili Powder – Adds heat; adjust to your spice preference.
• Coconut Milk – Ensures a creamy texture and aids in the marinade’s moisture content.
• Salt & Ground Black Pepper – Essential for balancing overall flavor.
• Brown Sugar/Honey – Balances the spices with a touch of sweetness.
• Red Pepper Flakes – Optional for additional heat, if you love a spicy kick!
For the Garnishes
• Fresh Cilantro – Brightens the flavor profile and adds freshness in every bite.
• Lime Juice – Adds a zesty kick that complements the savory chicken beautifully.
• Chopped Peanuts – For crunch and a nutty flavor; feel free to omit if allergic.
Whether you’re enjoying these Chicken Satay – Spring Roll Bowls as a quick weeknight dinner or meal-prepping for a busy week ahead, each ingredient plays a crucial role in crafting a delectable dish that delights the senses!
Step‑by‑Step Instructions for Chicken Satay – Spring Roll Bowls
Step 1: Marinate the Chicken
In a mixing bowl, combine the chicken thighs with olive oil, minced garlic, ginger paste, low-sodium soy sauce, and spices like yellow curry powder, ground turmeric, ground coriander, and chili powder. Pour in coconut milk, then season with salt, pepper, and brown sugar or honey. Toss well to coat the chicken evenly, cover, and marinate in the refrigerator for at least 30 minutes to infuse those bold flavors.
Step 2: Prepare the Skewers
While the chicken marinates, soak wooden skewers in warm water for about 20 minutes to prevent burning during cooking. Preheat your grill or cast-iron skillet over medium-high heat. Once ready, thread the marinated chicken onto the soaked skewers, aiming for 5-6 pieces per skewer. This allows for even cooking and easy handling when grilling.
Step 3: Cook the Chicken Skewers
Once your skewers are prepared, drizzle a little oil in your heated skillet or on the grill grates. Cook the chicken skewers for 5-6 minutes per side until they develop a golden caramelized crust. After browning, reduce the heat to low and let them cook for an extra 1-2 minutes, ensuring they reach an internal temperature of 165°F for safely juicy Chicken Satay.
Step 4: Create Your Spring Roll Bowls
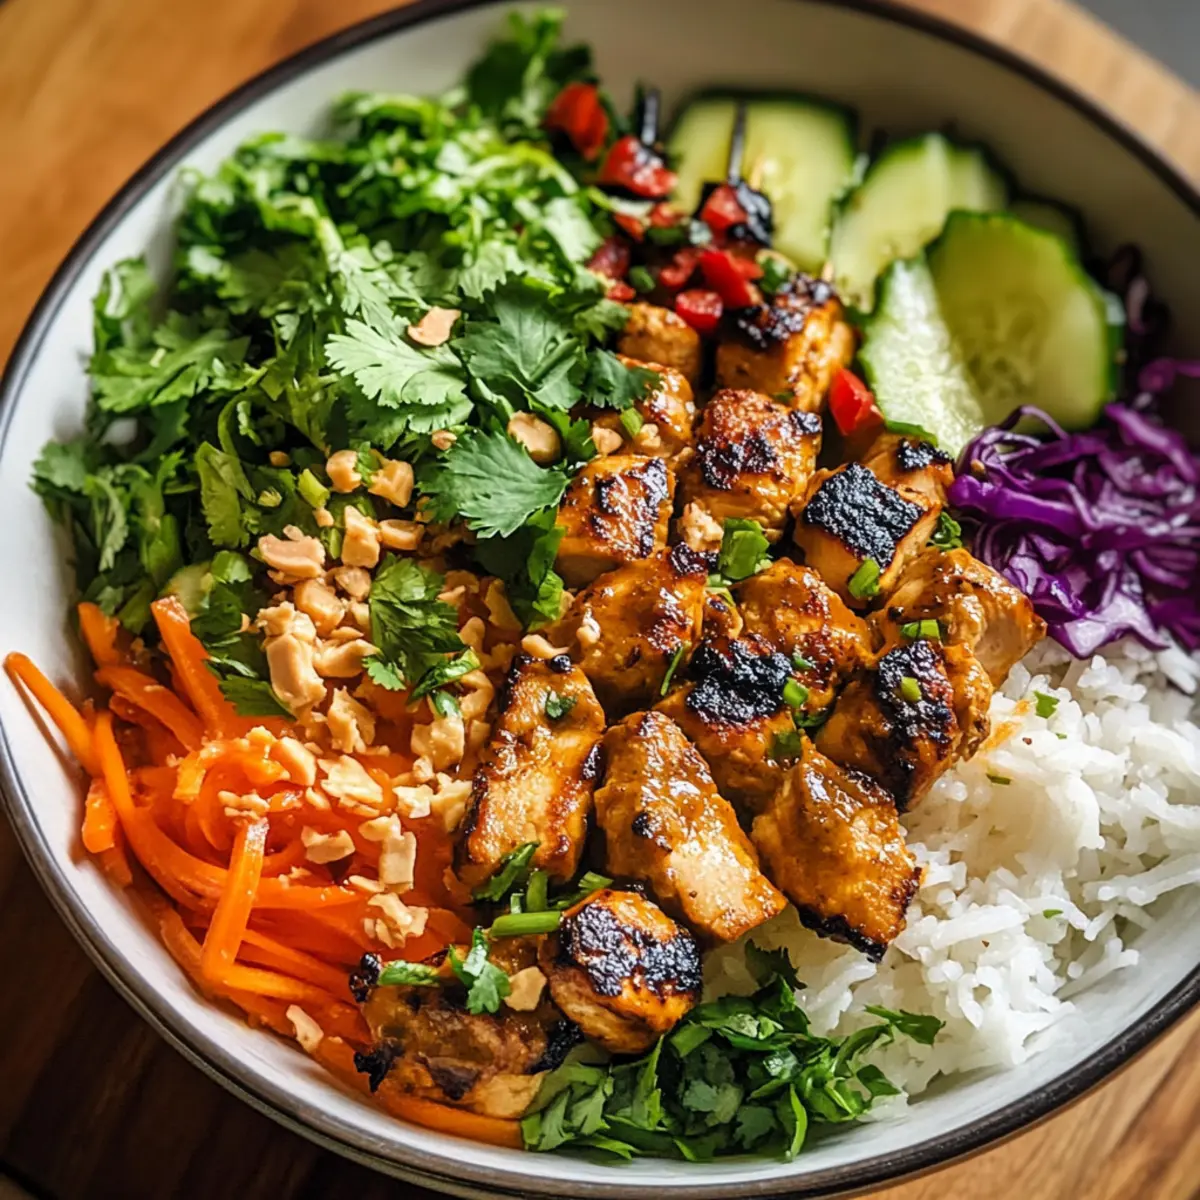
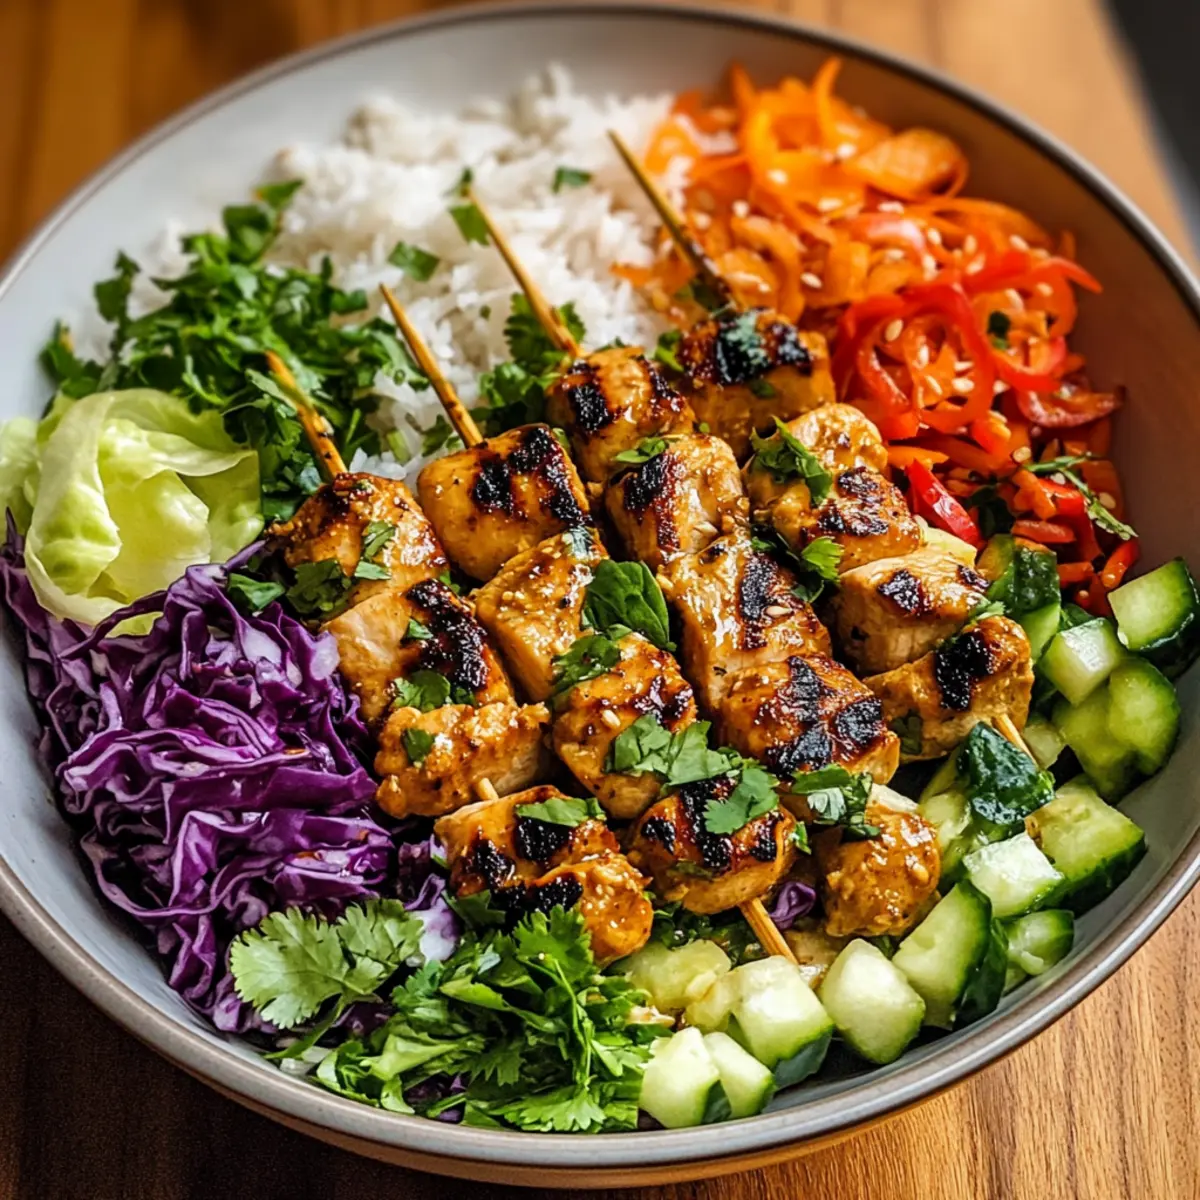
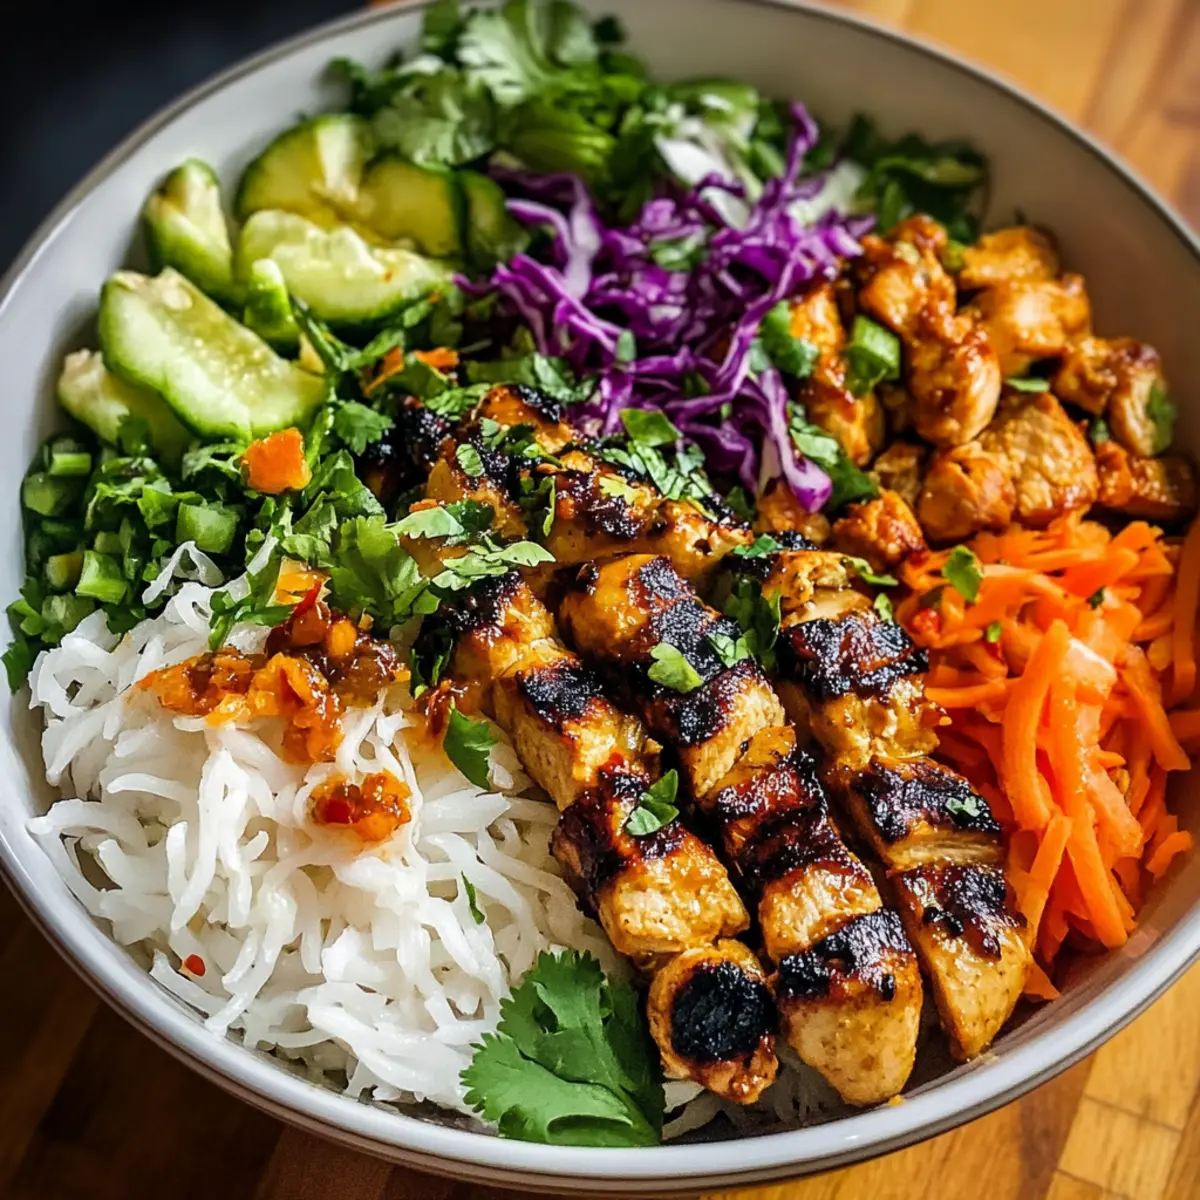
As the chicken finishes cooking, prepare your bowls by laying a base layer of rice, noodles, or fresh greens. Once the chicken skewers are ready, place them on top of the base. Follow with a colorful array of fresh vegetables such as shredded cabbage, sliced cucumbers, and julienned carrots, adding crunch and vibrancy to your Chicken Satay – Spring Roll Bowls.
Step 5: Garnish and Serve
Before serving, drizzle your choice of sauce over the assembled bowls for an extra layer of flavor. Finish with a sprinkle of fresh cilantro, a squeeze of lime juice, and a handful of chopped peanuts for delightful crunch. Enjoy the harmonious blend of savory chicken, crisp veggies, and bright herbs in each delicious bite!
Make Ahead Options
These Chicken Satay – Spring Roll Bowls are a perfect choice for busy meal prep enthusiasts! You can marinate the chicken up to 24 hours in advance, allowing the flavors to deepen beautifully. Simply combine the chicken thighs with all marinade ingredients, cover, and refrigerate until ready to cook. Additionally, you can chop your vegetables and store them in airtight containers for up to 3 days, keeping them fresh and crisp. When you’re ready to enjoy, just grill the marinated chicken and assemble your bowls with the prepped veggies. This way, dinner comes together in a flash, ensuring the Chicken Satay – Spring Roll Bowls taste just as delicious as if made fresh!
Expert Tips for Chicken Satay – Spring Roll Bowls
-
Marination Time: Ensure the chicken is marinated for at least 30 minutes, or overnight if possible, to guarantee maximum flavor infusion.
-
Consistent Cooking: Use a meat thermometer to check the internal temperature; aim for 165°F to avoid overcooking and drying out the chicken.
-
Skewering Technique: Avoid crowding the skewers. Leave some space between chicken pieces for even cooking and optimal caramelization.
-
Resting Period: Let the cooked chicken rest for a few minutes before serving to preserve the juices, enhancing tenderness and flavor.
-
Spice Adjustment: Tailor the heat level by adjusting the chili powder and red pepper flakes to suit your taste preferences for the Chicken Satay – Spring Roll Bowls.
Chicken Satay – Spring Roll Bowls Variations
Feel free to venture beyond the basics and customize your Chicken Satay – Spring Roll Bowls for a unique twist that excites your palate!
-
Vegetarian Delight: Use tofu or tempeh in place of chicken for a plant-based option that still captures the essence of satay.
-
Seafood Twist: Swap chicken with shrimp for a delicious seafood variation that cooks quickly and pairs beautifully with the fresh toppings.
-
Low-Carb Upgrade: Replace rice with cauliflower rice, giving you all the flavor without the carbs, making it perfect for keto followers.
-
Nut-Free Creaminess: If you have nut allergies, use sunflower seed butter instead of peanut butter in the sauce for a creamy texture without the peanuts.
-
Extra Crunch: Toss some crispy fried shallots or panko breadcrumbs on top for an added crunch that elevates every bite!
-
Heat it Up: Spice things up by adding diced jalapeños to your vegetable mix or drizzling sriracha over your bowl for a fiery kick.
-
Herb Infusion: Swap out cilantro for fresh mint or Thai basil to offer a different herbal note that brightens the entire dish.
-
Grain Varieties: Experiment with different bases like quinoa or barley for an exciting texture and flavor variation!
For more flavorful inspiration, try pairing these bowls with some seared Sticky Chicken Bowls or explore a refreshing Chopped Chicken Caesar Salad Wrap!
What to Serve with Chicken Satay – Spring Roll Bowls
When crafting a complete meal, consider pairing each bite of savory chicken with fresh, vibrant accompaniments that elevate your dining experience.
- Cucumber Salad: A refreshing side bursting with crunch and a hint of tang, perfect for balancing the rich flavors of the chicken.
- Steamed Jasmine Rice: Soft and fragrant, jasmine rice serves as a comforting base, soaking up every delicious sauce in the bowl.
- Crunchy Spring Rolls: Add even more texture with crispy spring rolls, offering a satisfying contrast to the tender chicken and veggies.
- Tropical Fruit Salad: A vibrant medley of mango, pineapple, and kiwi brings a sweet and zesty kick, brightening up the entire meal.
For beverages, try serving with a Chilled Thai Iced Tea. The creamy and sweet notes harmonize beautifully, creating a wonderful balance with the savory satay flavors. Lastly, consider a light Coconut Sorbet for dessert; it’s creamy and refreshing, leaving a delightful finish to your flavorful feast!
Storage Tips for Chicken Satay – Spring Roll Bowls
-
Fridge: Store leftover assembled Chicken Satay – Spring Roll Bowls in an airtight container in the fridge for up to 3 days to maintain freshness and flavor.
-
Separate Components: Keep chicken, vegetables, and bases (rice/noodles) stored separately to avoid sogginess and maintain crispness until ready to enjoy.
-
Freezer: You can freeze cooked chicken skewers for up to 2 months in a freezer-safe bag. Thaw overnight in the fridge before reheating.
-
Reheating: Reheat chicken gently in a skillet over medium heat, adding a splash of water or broth to prevent drying out, enjoying the delicious flavors once more!
Chicken Satay – Spring Roll Bowls Recipe FAQs
How do I choose the right chicken thighs for this recipe?
Absolutely! Look for chicken thighs that are plump and have a nice, even color. Avoid any with dark spots or a slimy texture. Fresh chicken thighs are ideal, as the dark meat will marinate beautifully, resulting in juicier, flavor-packed skewers.
How should I store leftover Chicken Satay – Spring Roll Bowls?
Store the assembled bowls in airtight containers in the fridge for up to 3 days. To preserve the freshness, keep the components—such as the chicken, vegetables, and base (rice or noodles)—separate until you’re ready to dig in!
Can I freeze the marinated chicken?
Absolutely! To freeze, place the marinated chicken in a freezer-safe bag or container, removing as much air as possible. It can be stored for up to 3 months. When ready to use, thaw it in the refrigerator overnight before cooking for the best results.
What should I do if my chicken is dry after cooking?
Don’t worry; it happens to the best of us! Ensure the chicken is properly marinated and heated to the correct internal temperature of 165°F. If it does turn out dry, try adding a splash of coconut milk or broth when reheating to bring back some moisture and flavor.
Are there any dietary considerations I should keep in mind?
Very! This recipe is naturally gluten-optional; just opt for gluten-free soy sauce for a gluten-free version. If someone has a peanut allergy, feel free to use sunflower seed butter in any sauces instead of peanut sauce. When preparing for guests, always check for specific allergies to ensure everyone enjoys safely.
Can I meal prep the Chicken Satay – Spring Roll Bowls?
Yes, indeed! For an effective meal prep, marinate the chicken ahead of time and cook it when needed. Store the chicken, fresh vegetables, and base separately to keep everything fresh. This way, you can assemble bowls quickly throughout the week, making meal times delightful and stress-free!
Savory Chicken Satay Spring Roll Bowls You'll Love
Ingredients
Equipment
Method
- In a mixing bowl, combine the chicken thighs with olive oil, garlic, ginger paste, soy sauce, and spices like curry powder, turmeric, coriander, and chili powder. Pour in coconut milk, then season with salt, pepper, and brown sugar or honey. Toss well to coat the chicken evenly, cover, and marinate in the refrigerator for at least 30 minutes.
- While the chicken marinates, soak wooden skewers in warm water for about 20 minutes. Preheat your grill or cast-iron skillet over medium-high heat. Thread the marinated chicken onto the soaked skewers, aiming for 5-6 pieces per skewer.
- Drizzle a little oil in your heated skillet or on the grill grates. Cook the chicken skewers for 5-6 minutes per side until golden. Reduce heat to low and cook an additional 1-2 minutes until internal temperature is 165°F.
- Prepare your bowls by laying a base of rice, noodles, or fresh greens. Once skewers are ready, place them atop the base and add vegetables like shredded cabbage, sliced cucumbers, and julienned carrots.
- Before serving, drizzle sauce over the bowls and finish with cilantro, lime juice, and chopped peanuts. Enjoy!
Leave a Reply