
As I walked through the local market, the inviting scent of baked pumpkin goodies left me drawn to the stands like a moth to a flame. There’s something undeniably heartwarming about the rich aroma of spices and baked treats, especially when autumn rolls around. That’s why I couldn’t resist recreating those delightful Starbucks Pumpkin Scones in my own kitchen. This recipe is quick and easy, letting you indulge in these cozy fall treats without ever leaving home. Not only do you get the satisfaction of baking from scratch, but you’ll also fill your kitchen with an enchanting scent that brings the spirit of the season alive. So, are you ready to dive into a batch that will have everyone clamoring for more?

Why are these scones a must-try?
Irresistible aroma: As soon as you bake these scones, your kitchen will be filled with the cozy scents of pumpkin and spices, welcoming everyone to the table.
Quick and easy: With minimal prep and bake time, you’ll have these delightful treats ready in no time—perfect for busy mornings or last-minute coffee dates!
Budget-friendly: Save money by making these homemade Starbucks Pumpkin Scones instead of purchasing them from the café, all while enjoying a fresh-out-of-the-oven taste.
Versatile: Customize your scones! Feel free to mix in nuts or swap spices for a unique twist, ensuring each batch is exciting and fresh.
Perfect for sharing: These scones are a crowd-pleaser. Serve them at brunch, share with friends, or enjoy them alongside a warm cup of your favorite beverage. For more enticing fall flavors, you might love trying my Moist Pumpkin Bread as well!
Starbucks Pumpkin Scones Ingredients
• Gather the essentials to create your homemade Starbucks Pumpkin Scones.
For the Scones
- All-Purpose Flour – Provides the structure needed for light and flaky scones.
- Brown Sugar – Adds moisture and a deeper flavor; brown sugar is key for that café-like taste.
- White Sugar – Balances the richness of brown sugar for a perfectly sweet scone.
- Baking Powder – Acts as a leavening agent to ensure your scones rise beautifully.
- Baking Soda – Works alongside the baking powder to help achieve that light texture.
- Salt – A flavor enhancer that helps balance the sweetness of the sugars.
- Ground Cinnamon – Infuses warm, comforting spices into each bite.
- Ground Cloves – Adds depth and a hint of earthy warmth to your scones.
- Ground Ginger – Provides a zesty contrast that brightens up the flavors.
- Ground Nutmeg – Complements the other spices, giving a nutty undertone.
- Cold Butter – Incorporate for flakiness; it’s crucial to keep it cold for the best texture.
- Canned Pumpkin Puree – Provides moisture and a rich pumpkin flavor; don’t use pumpkin pie filling!
- Cold Milk – Helps create a tender crumb; keep it cold for the best results.
- Egg – Acts as a binder, enriching the dough and adding stability.
- Vanilla Extract – Enhances the flavor and aroma of the scones.
For the Glaze
- Powdered Sugar – Adds sweetness for the glaze, giving a lovely finish to the scones.
- Heavy Cream – Adjusts the consistency of the glaze to make it smooth and pourable.
Now that you have all the ingredients ready, let’s get to baking those delightful Starbucks Pumpkin Scones that will have your friends and family lining up for seconds!
Step‑by‑Step Instructions for Homemade Starbucks Pumpkin Scones
Step 1: Preheat the Oven
Start by preheating your oven to 400°F (200°C). This is essential for achieving that perfect golden-brown crust on your scones. While the oven heats up, gather all your ingredients and ensure they are cold, particularly the butter and milk, as this will help create the flaky texture you desire for your Starbucks Pumpkin Scones.
Step 2: Make the Wet Mixture
In a medium bowl, whisk together the cold pumpkin puree, cold milk, egg, and vanilla extract until fully combined. This wet mixture will infuse your scones with rich flavor and moisture. Aim for a smooth consistency, and keep it cold until you need to combine it with the dry ingredients, ensuring the best results in texture and taste.
Step 3: Prepare the Dry Mixture
In a large mixing bowl, combine the all-purpose flour, brown sugar, white sugar, baking powder, baking soda, salt, and all your spices (cinnamon, cloves, ginger, nutmeg). Whisk these dry ingredients together until they are well incorporated and no lumps remain. This step is crucial because it sets the foundation for the flavor profile of your homemade Starbucks Pumpkin Scones.
Step 4: Cut in the Butter
Next, cut the cold butter into small pieces and add them to the dry mixture. Use a pastry cutter or your fingers to work the butter into the flour until the mixture resembles coarse crumbs with pea-sized butter bits remaining. The cold butter will create the flakiness your scones need, so be gentle and avoid overworking the dough at this stage.
Step 5: Combine Mixtures
Pour the cold wet mixture into the bowl with your dry ingredients. Gently stir with a spatula or wooden spoon until just combined, forming a shaggy dough that should still be a bit sticky. Take care not to overmix, as this can lead to dense scones instead of the light, tender texture we love in homemade Starbucks Pumpkin Scones.
Step 6: Shape the Dough
Turn the dough out onto a lightly floured surface. Pat it out into an 8×5 inch rectangle, ensuring it maintains a uniform thickness. Once shaped, use a sharp knife to cut it into 6 equal squares or triangles, depending on your preference. This will give your scones their signature shape, allowing them to bake evenly.
Step 7: Chill the Scones
Place your cut scones onto a parchment-lined baking sheet. It’s important to chill them in the refrigerator for 15-20 minutes to help them hold their shape while baking. This step is key to achieving a nicely risen and perfectly formed scone, reminiscent of those from your favorite café.
Step 8: Bake the Scones
Once chilled, remove the scones from the refrigerator and bake them in the preheated oven for about 17-18 minutes. Keep an eye on them—once they turn golden brown and a toothpick inserted in the center comes out clean, they’re done. Let them cool slightly on the baking sheet before transferring to a wire rack.
Step 9: Prepare the Glaze
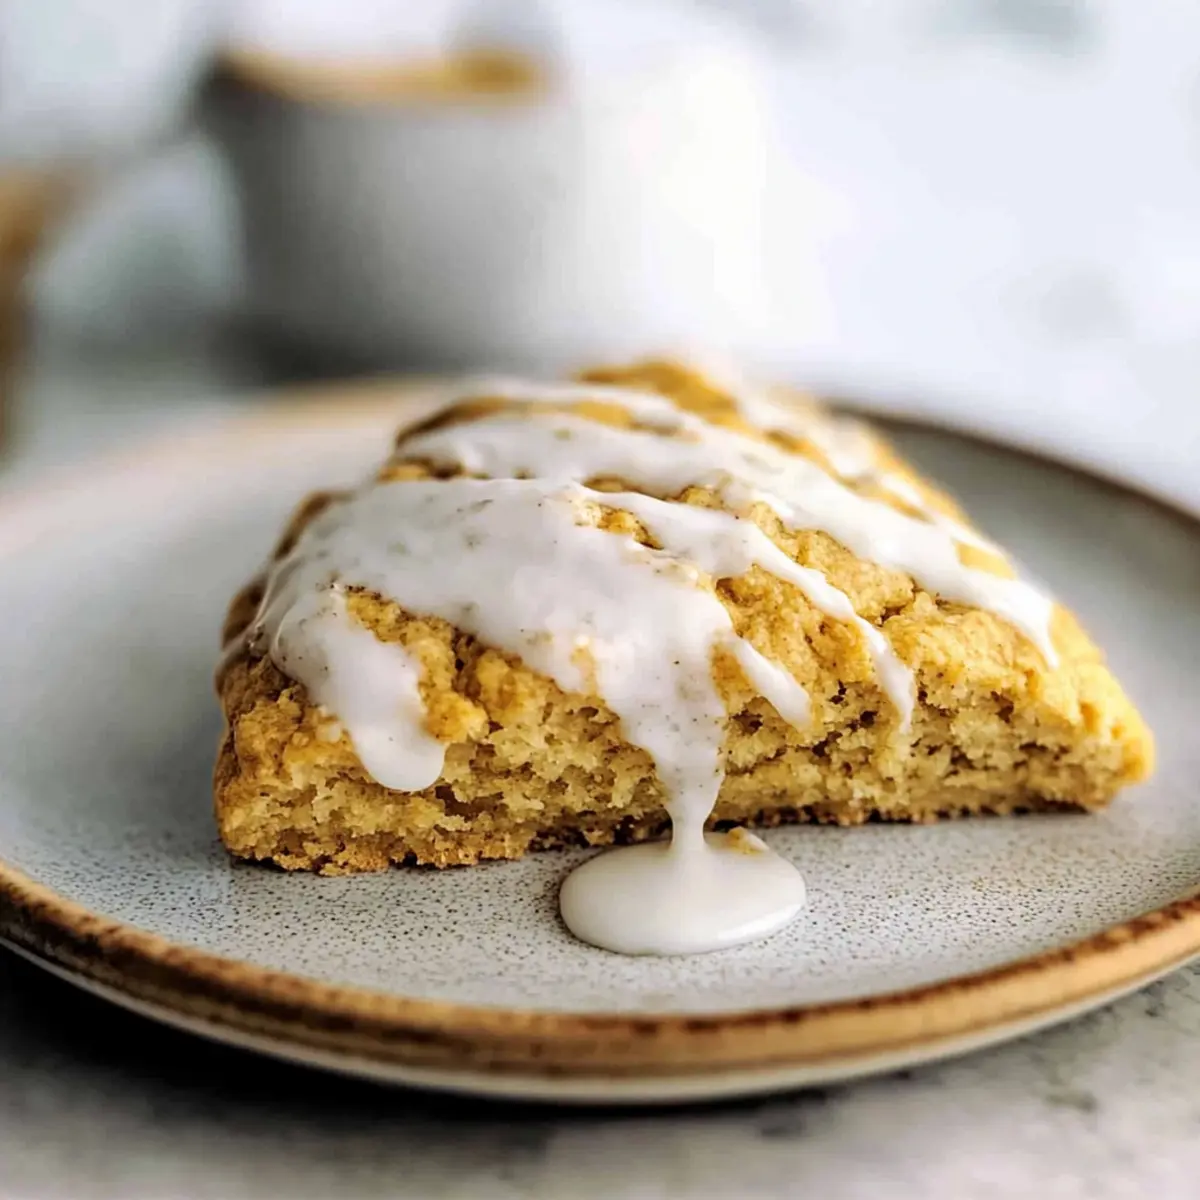
While your scones cool, prepare the vanilla glaze by whisking together powdered sugar and heavy cream until smooth. Drizzle the glaze over the cooled scones for a sweet finishing touch. If desired, you can also prepare a spiced glaze using some of the same spices for added flavor, giving your homemade Starbucks Pumpkin Scones an extra layer of festive touch!
Make Ahead Options
These Homemade Starbucks Pumpkin Scones are perfect for meal prep and can help you save valuable time during busy mornings. You can prepare and shape the scones up to 24 hours in advance; simply chill them in the refrigerator before baking to maintain their structure. The dough can also be made and refrigerated for up to 3 days before baking. Just be sure to keep the butter and liquids cold to ensure a flaky texture. When you’re ready to enjoy, bake them fresh from the fridge, adding a few extra minutes to the baking time if needed. With these make-ahead tips, you can savor the delicious flavor of homemade scones with minimal effort!
Starbucks Pumpkin Scones Variations & Substitutions
Feel free to get creative and give these scones your personal touch with these delightful variations!
-
Dairy-Free: Substitute cold milk with almond or oat milk, and use dairy-free butter for a delicious vegan treat. You’ve got a warm, cozy option that everyone can enjoy.
-
Nutty Addition: Stir in 1/2 cup of finely chopped walnuts or pecans for an extra layer of crunch, transforming your scones into a nutty delight that complements the pumpkin flavor beautifully.
-
Spice It Up: Experiment with pumpkin pie spice or even add a pinch of allspice for a unique flavor twist that will surprise your taste buds. Each variation brings a delightful depth to your home-baked goods.
-
Fresh Pumpkin: Replace canned pumpkin puree with fresh pumpkin puree or roasted butternut squash for a fresher, more vibrant flavor. It makes these scones extra special and seasonal!
-
Sugar Swap: Use coconut sugar or maple sugar for a lower glycemic option that provides a subtly different flavor and sweetness. It’s a simple switch that can elevate your scone experience.
-
Gluten-Free: Substituting all-purpose flour with a gluten-free blend works wonders, letting everyone enjoy a tender and fluffy scone. Just like these Moist Pumpkin Bread, these scones can be made accommodating without losing flavor.
-
Fruity Twist: Incorporate some dried cranberries or chocolate chips into the dough for a sweet and tart surprise in every bite. This fruity addition pairs well with coffee for a lovely café experience at home.
-
Extra Glaze: Drizzle a spiced glaze using maple syrup and pumpkin spice instead of plain vanilla for a flavorful finish that enhances the cozy autumn vibe. A hint of warmth never hurts!
Why not try these variations? They can transform these scones into countless cherished family favorites!
Expert Tips for Perfect Starbucks Pumpkin Scones
-
Keep It Cold: Ensure butter and liquids are cold. This helps achieve a light, flaky texture in your scones—just like at Starbucks!
-
Don’t Overmix: Gently combine the ingredients to avoid dense scones. Overworking the dough can ruin that desired tender crumb.
-
Chill Before Baking: Always chill shaped scones for 15-20 minutes. This step maintains their shape and prevents spreading in the oven.
-
Use Pumpkin Puree: Use pure canned pumpkin puree, not pumpkin pie filling. This ensures the right moisture level and flavor profile for your scones.
-
Watch the Oven: Baking time may vary, so keep an eye on the scones. Remove them once golden brown and a toothpick inserted comes out clean for best results.
Storage Tips for Starbucks Pumpkin Scones
Room Temperature: Store leftover scones in an airtight container at room temperature for up to 3 days to maintain their freshness and flavor.
Fridge: If you prefer a firmer texture, you can refrigerate them for up to a week; be sure to wrap them tightly to prevent drying out.
Freezer: For longer storage, freeze unglazed scones, wrapping them well in plastic wrap before placing them in a freezer bag. They’ll stay fresh for up to 3 months.
Reheating: To enjoy them warm, reheat frozen scones directly from the freezer in a 350°F (175°C) oven for about 10-12 minutes, or until warmed through.
What to Serve with Homemade Starbucks Pumpkin Scones?
As you indulge in these delightful scones, consider pairing them with delicious accompaniments that elevate your cozy breakfast or afternoon treat experience.
- Creamy Hot Chocolate: The rich, chocolatey flavors create a delicious contrast to the warm spices of the scones, making every bite feel indulgent.
- Maple Butter: This sweet spread melts beautifully atop warm scones, adding a touch of sweetness that complements the pumpkin flavor.
Enjoying your scones with a drink is always a win. Pair with a steaming cup of spiced chai for a warming afternoon break.
- Fresh Fruit Salad: The bright, refreshing notes of seasonal fruits add a burst of freshness, balancing the scones’ richness and making your meal feel complete.
- Chai Tea: Infused with warming spices, it echoes the flavors of the scones and creates a comforting, aromatic experience.
- Honey Yogurt Dip: A lightly sweetened yogurt dip enhances the scones while providing a luscious, creamy component to each bite.
These combinations promise to delight your tastebuds and enhance your homemade Starbucks Pumpkin Scones experience!

Starbucks Pumpkin Scones Recipe FAQs
How do I choose the best pumpkin puree for this recipe?
Absolutely! Look for 100% pure canned pumpkin puree without any added sugars or spices. This type is ideal for ensuring the right moisture and flavor. If you prefer fresh pumpkin, you can roast a sugar pumpkin, scoop out the flesh, and blend it until smooth for a homemade alternative.
What’s the best way to store leftover Starbucks Pumpkin Scones?
You can keep your leftover scones in an airtight container at room temperature for up to 3 days. For longer storage, I recommend wrapping the unglazed scones well in plastic wrap and placing them in a freezer bag. They can be stored in the freezer for up to 3 months. When you’re ready to enjoy them, simply reheat from frozen at 350°F for about 10-12 minutes.
Can I freeze Starbucks Pumpkin Scones?
Yes, of course! To freeze, allow the scones to cool completely and leave them unglazed. Wrap each scone tightly in plastic wrap, then place them in a freezer bag, making sure to remove as much air as possible. Label them with the date, and they’ll be good for up to 3 months. When ready to enjoy, just pop them in an oven preheated to 350°F for about 10-12 minutes, and they’ll be as fresh as the day you baked them!
What if my scones turn out too dense?
Very! If your scones are dense, it usually means the dough was overmixed or the butter was too warm. Always mix the wet and dry ingredients gently until just combined to maintain that fluffy texture. Also, keeping the butter and liquids cold is key to achieving the perfect rise—make it a priority!
Are these scones suitable for those with dietary restrictions?
Yes! While the recipe includes dairy, it can easily be adapted for lactose intolerance by using plant-based milk and vegan butter. If you have nut allergies, ensure that any substitutions or add-ins like nuts are safe for you. Always double-check ingredient labels to be sure they meet your dietary needs, especially for packaged items like baking powder and vanilla extract.
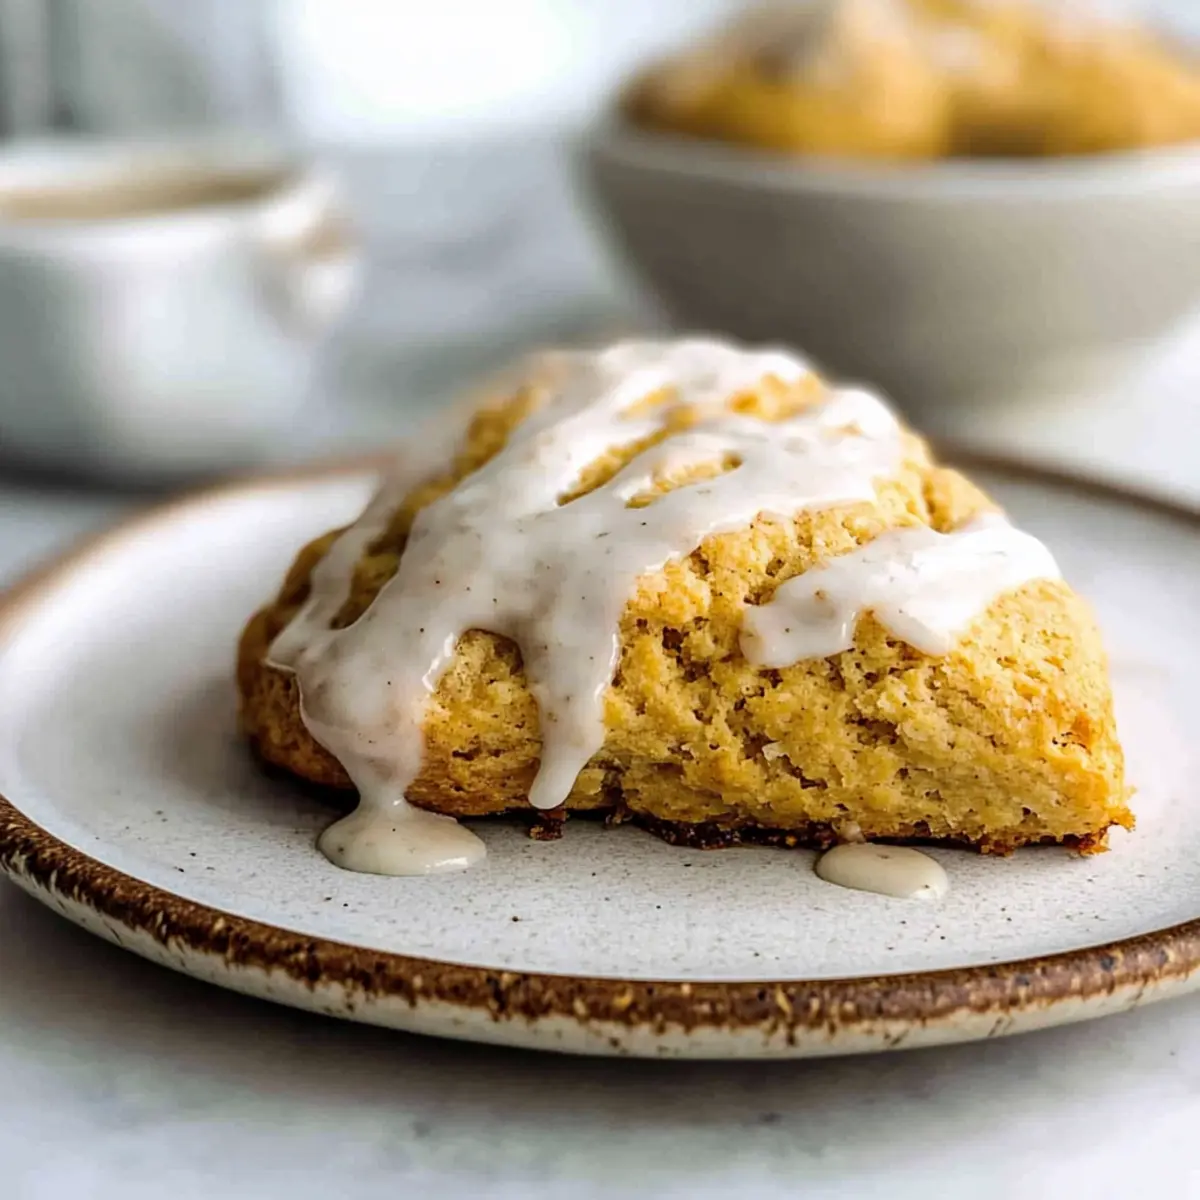
Delicious Starbucks Pumpkin Scones You Can Bake at Home
Ingredients
Equipment
Method
- Preheat your oven to 400°F (200°C) and gather all your cold ingredients.
- In a medium bowl, whisk together cold pumpkin puree, cold milk, egg, and vanilla extract.
- In a large mixing bowl, combine all-purpose flour, brown sugar, white sugar, baking powder, baking soda, salt, cinnamon, cloves, ginger, and nutmeg.
- Cut cold butter into small pieces and work it into the dry mixture until resembling coarse crumbs.
- Pour the cold wet mixture into the dry ingredients and stir until just combined, forming a shaggy dough.
- Turn the dough onto floured surface, pat into an 8x5 inch rectangle, and cut into 6 pieces.
- Place scones on a parchment-lined baking sheet and chill in the refrigerator for 15-20 minutes.
- Bake scones in the preheated oven for 17-18 minutes until golden brown.
- Prepare the vanilla glaze by whisking powdered sugar and heavy cream until smooth, then drizzle over cooled scones.
Leave a Reply