
As I stood in my kitchen, the aroma of fresh herbs and spices piqued my curiosity—it was time to whip up something fresh and exciting. Enter the Chopped Italian Grinder Sandwich, a vibrant and delectable creation that can be ready in mere minutes. This quick meal is perfect for those days when you need a tasty solution without the fast food guilt. Not only does this sandwich allow for endless customization—switching up the ingredients to fit your mood or dietary needs—but it also keeps me satisfied with every hearty, crunchy bite. With the option for healthy variations and gluten-free choices, I can tailor this dish to please even the pickiest of eaters. Are you ready to dive into this flavor-packed adventure and discover your new favorite sandwich?
Why is this sandwich a crowd favorite?
Quick and Easy: This Italian Grinder Sandwich comes together in just 10 minutes, making it an ideal choice for anyone looking for a speedy, delicious meal.
Customizable Delight: With endless options for fillings and dressings, you can personalize this sandwich to fit your cravings or dietary restrictions—think salad-inspired or vegetarian versions!
Flavor Explosion: Each bite is a savory treat, blending fresh veggies, rich meats, and an aromatic seasoning that will transport your taste buds straight to Italy.
Perfect for Any Occasion: Whether you’re hosting a casual dinner or need a packed lunch for work, this sandwich can be served in various ways, similar to a gourmet Ciabatta Sandwich Elevate.
Health-Conscious Options: Want something lighter? No problem! Swap ingredients or use gluten-free wraps for a meal that fits your lifestyle.
Make Ahead Potential: Pre-chop your ingredients for easy assembly later, allowing you to impress guests or simply savor the flavors at your leisure. Enjoy this fantastic Italian Grinder Sandwich today!
Italian Grinder Sandwich Ingredients
• Get ready to assemble your flavorful creation!
For the Bread
- French baguette or Italian sub roll – Perfect as a hearty base for your sandwich.
- Spinach herb wraps or pita pockets – Use these for a low-carb alternative.
For the Meats
- Deli-sliced ham (4 ounces) – Provides a savory protein punch that pairs beautifully with other flavors.
- Deli-sliced salami (4 ounces) – Choose your favorite type for an extra-rich layer of taste.
- Deli-sliced sandwich pepperoni (4 ounces) – Adds a delightful spicy kick.
- Deli-sliced peppered turkey (4 ounces) – Offers lean protein but can be swapped for roast beef.
For the Cheese
- Provolone cheese (4 ounces) – Melts perfectly, enhancing the overall flavor.
- Mozzarella – A great alternative if you prefer a milder cheese.
For the Vegetables
- Shredded iceberg lettuce (1 cup) – Delivers crispness that complements the savory elements.
- Large tomato (½, sliced) – Juiciness and freshness in every bite; heirloom tomatoes bring added flavor.
- Large red onion (¼, thinly sliced) – Introduces a sharp bite; red or green onions work too.
- Sliced green or black olives (¼ cup) – Contributes a briny contrast; omit for a milder sandwich.
- Sliced banana peppers (¼ cup) – Infuses tang and a hint of heat; jalapeños can be used for extra spice.
- Fresh basil (1 tablespoon, optional) – Elevates freshness, although you can skip this if needed.
For the Dressing
- Red wine vinegar (½ tablespoon) – Adds a perfect acidity to balance the flavors; try balsamic for a sweeter touch.
- Extra-virgin olive oil (1½ tablespoons) – Essential for richness in your dressing.
- Italian seasoning blend (1 teaspoon) – Imparts classic Italian flavors; a homemade blend adds an extra personal flair.
- Salt and pepper (to taste) – Adjust to elevate all your sandwich flavors.
Enjoy crafting your Italian Grinder Sandwich! The combinations are endless, and you can quickly cater to any palate or preference.
Step‑by‑Step Instructions for Italian Grinder Sandwich
Step 1: Layer Base Ingredients
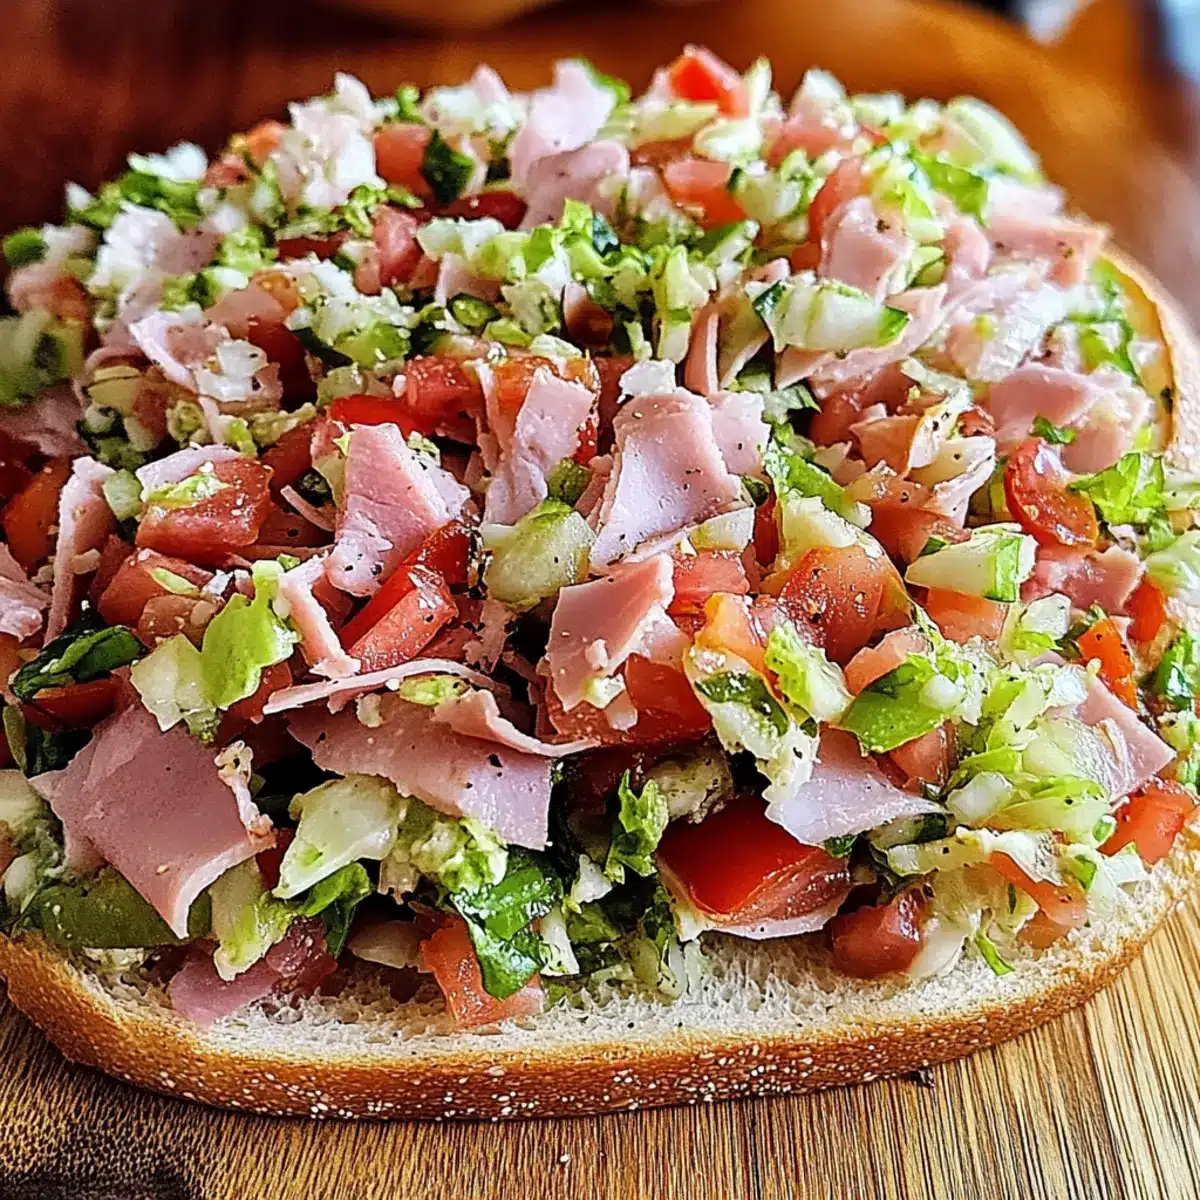
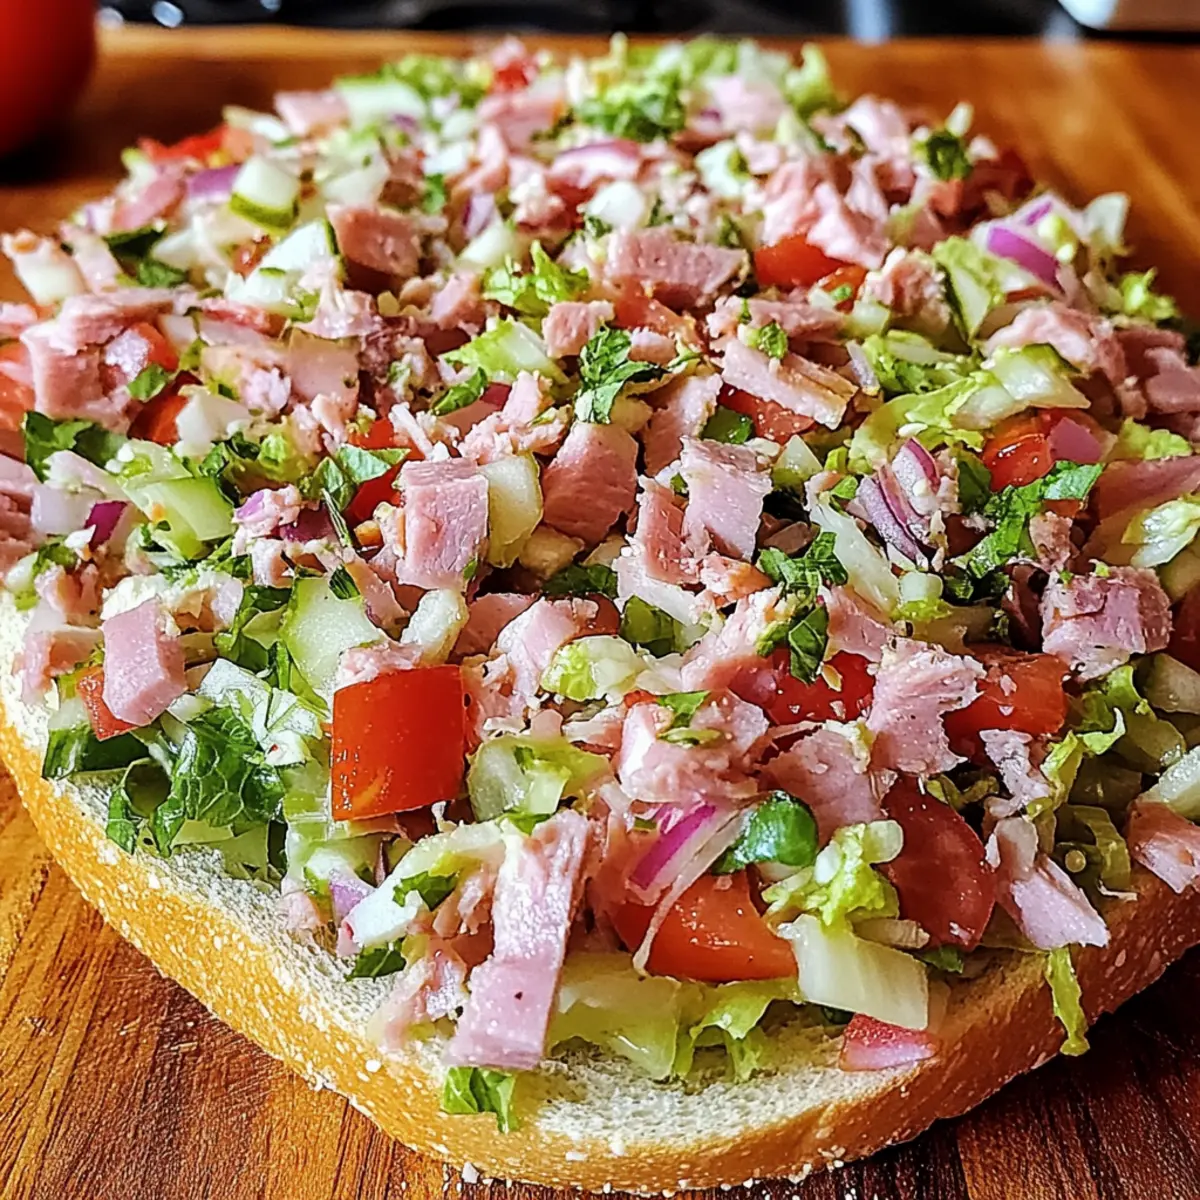
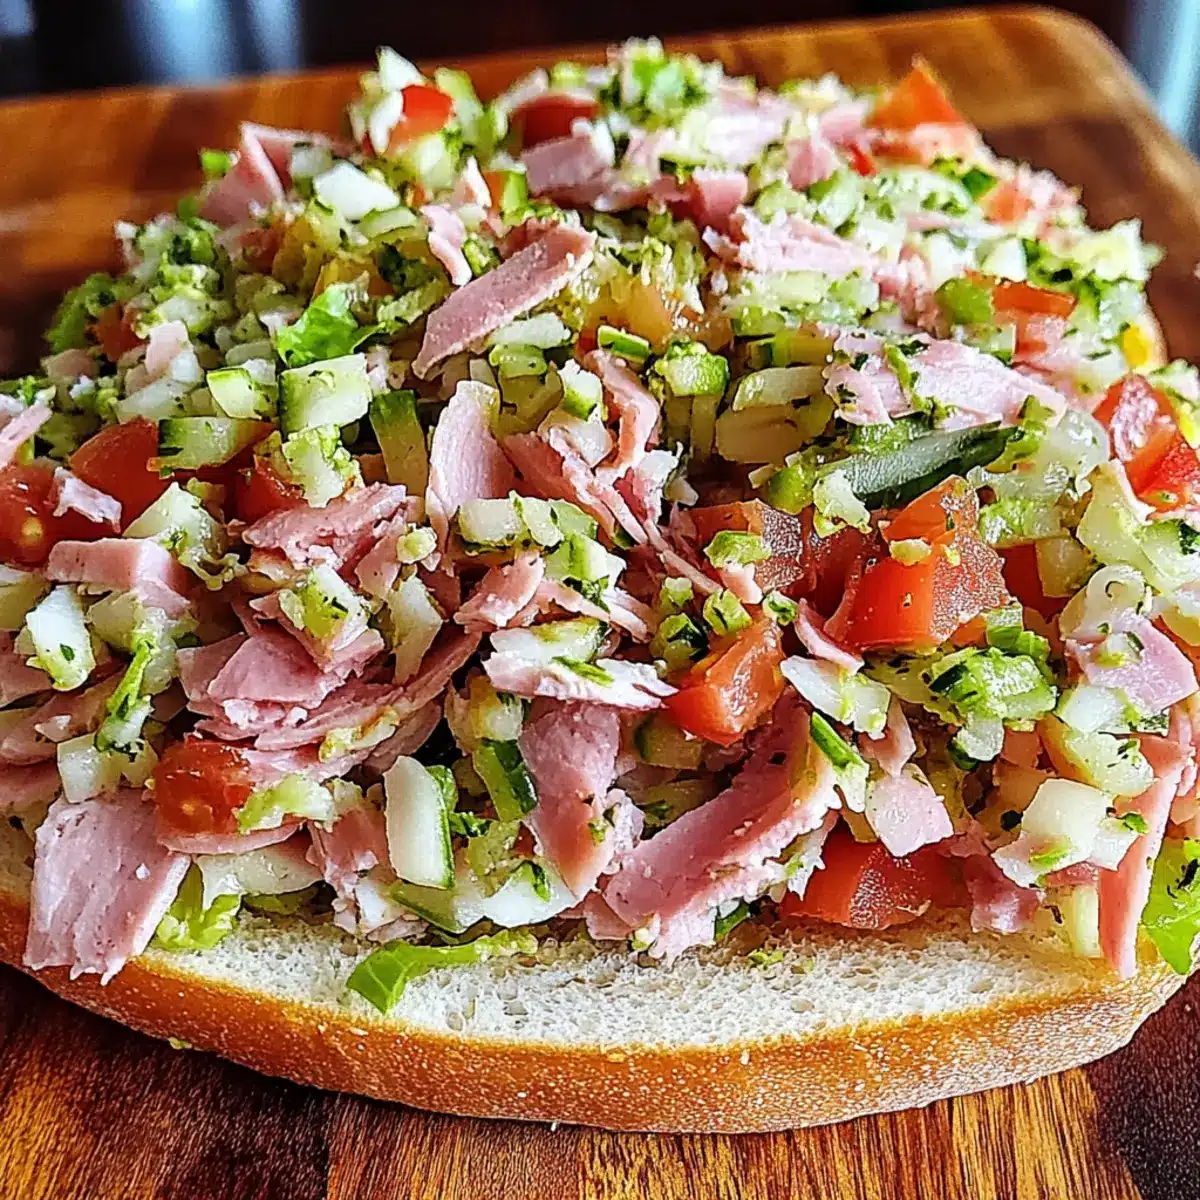
Begin by preparing your Italian Grinder Sandwich base. On a clean cutting board, evenly layer 1 cup of shredded iceberg lettuce, followed by slices of fresh tomato (about half a large tomato), thinly sliced red onion, a handful of sliced green or black olives, and banana peppers. Make sure to arrange these ingredients close together, creating a vibrant rainbow of colors and textures.
Step 2: Add Meats and Cheese
Next, it’s time to build the flavorful heart of your sandwich. Pile 4 ounces each of deli-sliced ham, salami, sandwich pepperoni, and peppered turkey on top of your layered vegetables, topping it all off with 4 ounces of provolone cheese. These robust layers offer a savory experience that elevates your Italian Grinder Sandwich to new heights—make sure the meats are evenly distributed!
Step 3: Chop Ingredients
Grab a sharp chef’s knife and chop the layered ingredients into bite-sized pieces, ensuring a good mix of meat, cheese, and veggies in every morsel. Work carefully to maintain even pieces, which enhances the overall texture when assembled. The vibrant colors should blend beautifully, creating a visually appealing medley that showcases the flavors in your Italian Grinder Sandwich.
Step 4: Combine Filling
Transfer the chopped mixture into a large mixing bowl. This will prepare your filling for the next step. Stir gently to combine all the elements, allowing the flavors of the meats, vegetables, and cheese to mingle. This step is crucial for ensuring that every bite of your Italian Grinder Sandwich bursts with the combined flavors of its ingredients.
Step 5: Prepare Dressing
In a separate bowl, whisk together 1½ tablespoons of extra-virgin olive oil, ½ tablespoon of red wine vinegar, 1 teaspoon of Italian seasoning, and add salt and pepper to taste. Drizzle the dressing over your mixed filling and stir well to ensure every piece is coated. The dressing is essential for tying together all the flavors of your Italian Grinder Sandwich, so don’t skip this step!
Step 6: Serve
Finally, it’s time to assemble your Italian Grinder Sandwich. Transfer the flavorful filling into toasted French baguettes or Italian sub rolls, ensuring each sandwich gets a generous amount. If desired, sprinkle with fresh basil for a touch of brightness. Enjoy your creation immediately or serve with a side of chips for a satisfying meal; either way, this Italian Grinder Sandwich is sure to delight!

What to Serve with Chopped Italian Grinder Sandwich
Elevate your meal with delightful sides that perfectly complement this flavor-packed sandwich.
- Crispy Potato Chips: Their crunchiness adds a delightful contrast to the savory softness of the sandwich. Perfect for snacking alongside!
- Refreshing Fruit Salad: A medley of fresh fruits provides a sweet balance that enhances the savory flavors of the Italian Grinder Sandwich.
- Classic Pasta Salad: This light dish with herbs and veggies makes a perfect companion, drawing out the Italian essence in every bite.
- Roasted Vegetable Medley: The earthy flavors of roasted vegetables offer a warm, comforting side, enriching your meal with healthful goodness.
- Zesty Coleslaw: A tangy slaw adds a crispy, crunchy texture, bringing a delightful brightness that pairs well with the hearty grinder.
- Italian Bruschetta: Fresh tomatoes, basil, and garlic on toasted bread echo the vibrant flavors of the sandwich, creating a cohesive dining experience.
- Sparkling Lemonade or Iced Tea: A refreshing drink completes the meal while cutting through the richness, ensuring every element shines.
- Chocolate Chip Cookies: For a sweet end, these classic treats are an irresistible way to cap off your Italian feast, balancing savory with sweet.
How to Store and Freeze Italian Grinder Sandwich
-
Room Temperature: It’s best to enjoy the Italian Grinder Sandwich immediately after assembly to maintain its crispness and flavor. If left out, consume within 2 hours.
-
Fridge: Leftover filling can be stored in an airtight container for up to 3 days. Ensure it’s well-sealed to keep the flavors intact and avoid moisture.
-
Freezer: For longer storage, freeze the leftover filling for up to 3 months. Use a freezer-safe container, and when ready to enjoy, thaw in the fridge overnight before assembling your sandwich.
-
Reheating: If reheating any component, use a toaster oven for the bread to retain its crunch. Warm the meat and veggies in the microwave for about 30 seconds, but avoid sogginess by not reheating for too long.
Italian Grinder Sandwich Variations
Feel free to explore exciting twists and substitutions to make this Italian Grinder Sandwich uniquely yours!
- Dairy-Free: Use vegan cheese or avocado instead of provolone to keep it creamy without the dairy.
- Vegetarian: Swap all meats for grilled veggies and roasted red peppers to create a delicious plant-based version.
- Gluten-Free: Opt for gluten-free wraps or bread to accommodate dietary restrictions while still enjoying this vibrant sandwich.
- Extra Crunch: Add a handful of crispy jalapeños or fried onions for an irresistible crunch that will tantalize your taste buds.
- Spicy Kick: Spice things up with sliced fresh jalapeños or a drizzle of your favorite hot sauce for those who love a bit of heat.
- Mediterranean Twist: Incorporate hummus as a spread instead of mayonnaise—pair it with kalamata olives and feta for a unique flavor profile.
- Fruit Infusion: Toss in some slices of apple or pear for a sweet contrast that beautifully balances the savory components.
- Herb Variety: Experiment with fresh herbs like parsley or cilantro for a fresh and fragrant twist, enhancing the taste of the whole sandwich.
Need more inspiration for sandwich pairings? Try serving it alongside a refreshing fruit salad or a light pasta salad to complete your meal—just like with a delightful Avocado Melt Sandwich or a cozy Ciabatta Sandwich Elevate. Enjoy customizing, and let your culinary creativity shine!
Expert Tips for Italian Grinder Sandwich
-
Fresh Assembly: Make your Italian Grinder Sandwich just before serving to keep the bread crisp and avoid sogginess. The texture is a key part of the experience!
-
Ingredient Flexibility: Don’t hesitate to switch out meats or cheese based on what you have on hand. This sandwich is all about customization to suit your taste!
-
Layer Strategically: To avoid a slushy sandwich, layer meats and veggies with care, keeping moisture-rich ingredients, like tomatoes, away from the bread until ready to enjoy.
-
Storing Leftovers: If you have filling left over, store it in an airtight container in the fridge for up to three days. For longer storage, freeze it for up to three months!
-
Mini Sandwiches: For a fun party platter, consider making mini grinder sandwiches using smaller rolls. They’re perfect for sharing and easier to customize for diverse tastes!
Make Ahead Options
These Chopped Italian Grinder Sandwiches are fantastic for meal prep, allowing you to enjoy delicious flavors with minimal effort later on! You can chop the vegetables and slice the meats up to 24 hours in advance, storing them in separate airtight containers in the refrigerator to keep them fresh and crisp. Additionally, prepare the dressing ahead of time and keep it chilled until you’re ready to assemble. When it’s time to enjoy your sandwiches, simply mix the prepped ingredients with the dressing, and spoon them into your choice of bread or wraps for a quick, satisfying meal that’s just as delicious as if made fresh!
Italian Grinder Sandwich Recipe FAQs
How do I choose the ripest ingredients for my Italian Grinder Sandwich?
Absolutely! When selecting your ingredients, look for vibrant colors and fresh textures. For tomatoes, an heirloom with a firm exterior and slight give when pressed is ideal. Choose crunchy iceberg lettuce that’s crisp and bright green. Deli meats should be fresh, and for cheese, opt for a package with no dark spots. Always give your ingredients a quick sniff; if something smells off, it’s best to leave it behind!
What are the best storage methods for leftover Italian Grinder Sandwich filling?
Very good question! After making your sandwich, if you have leftover filling, scoop it into an airtight container. It can be stored in the fridge for up to 3 days. Ensure that it’s sealed tightly to keep it fresh. For longer storage, freeze the filling in a freezer-safe container for up to 3 months. Remember to thaw it in the fridge overnight before using it again.
Can I freeze the ingredients for my Italian Grinder Sandwich?
Absolutely! If you plan to freeze your filling, make sure it’s stored properly. Layer the meat, cheese, and vegetables in a freezer-safe container, and it should keep well for up to 3 months. When you’re ready to enjoy it, simply remove it from the freezer the night before and let it thaw in the fridge. Once thawed, just assemble your sandwich and enjoy the same delicious flavors!
What can I do if my sandwich filling ends up soggy?
Oh no! To prevent sogginess, it’s crucial to layer your ingredients wisely. Make sure to keep your moisture-laden ingredients, like tomatoes and olives, away from direct contact with the bread until you’re ready to serve. If it’s already soggy, you can gently pat the filling with paper towels to absorb excess moisture before assembling. Toast your bread lightly to create a protective barrier as well.
Are there any dietary considerations I should keep in mind when preparing an Italian Grinder Sandwich?
Great question! When making your Italian Grinder Sandwich, consider any allergies or dietary preferences of those you’re serving. Dairy-free cheese options or gluten-free wraps are wonderful substitutes for those with restrictions. For pet owners, it’s also best to keep any leftover sandwich ingredients out of reach, as certain components, like onions, can be harmful to pets. Always check for allergens specific to your guests!
How can I make my Italian Grinder Sandwich healthier?
Absolutely! To make your Italian Grinder Sandwich even healthier, consider swapping out the traditional bread for spinach herb wraps to cut down on carbs. You can also increase the veggie content by adding sliced cucumbers or bell peppers, or opting for leaner deli meats like turkey. Experimenting with lighter dressings, like a vinaigrette made with lemon juice and olive oil, can also elevate your sandwich without the extra calories.
Italian Grinder Sandwich: Quick, Customizable Flavor Explosion
Ingredients
Equipment
Method
- Layer the base ingredients on a board, starting with lettuce, tomato, red onion, olives, and banana peppers.
- Add the deli meats and provolone cheese on top of the vegetables.
- Chop the layered ingredients into bite-sized pieces for a good mix.
- Combine the chopped mixture in a bowl, mixing well.
- Prepare the dressing by whisking together the olive oil, vinegar, seasoning, salt, and pepper, and drizzle over the filling.
- Assemble the filling into the toasted bread, sprinkle with basil if desired, and serve.
Leave a Reply