
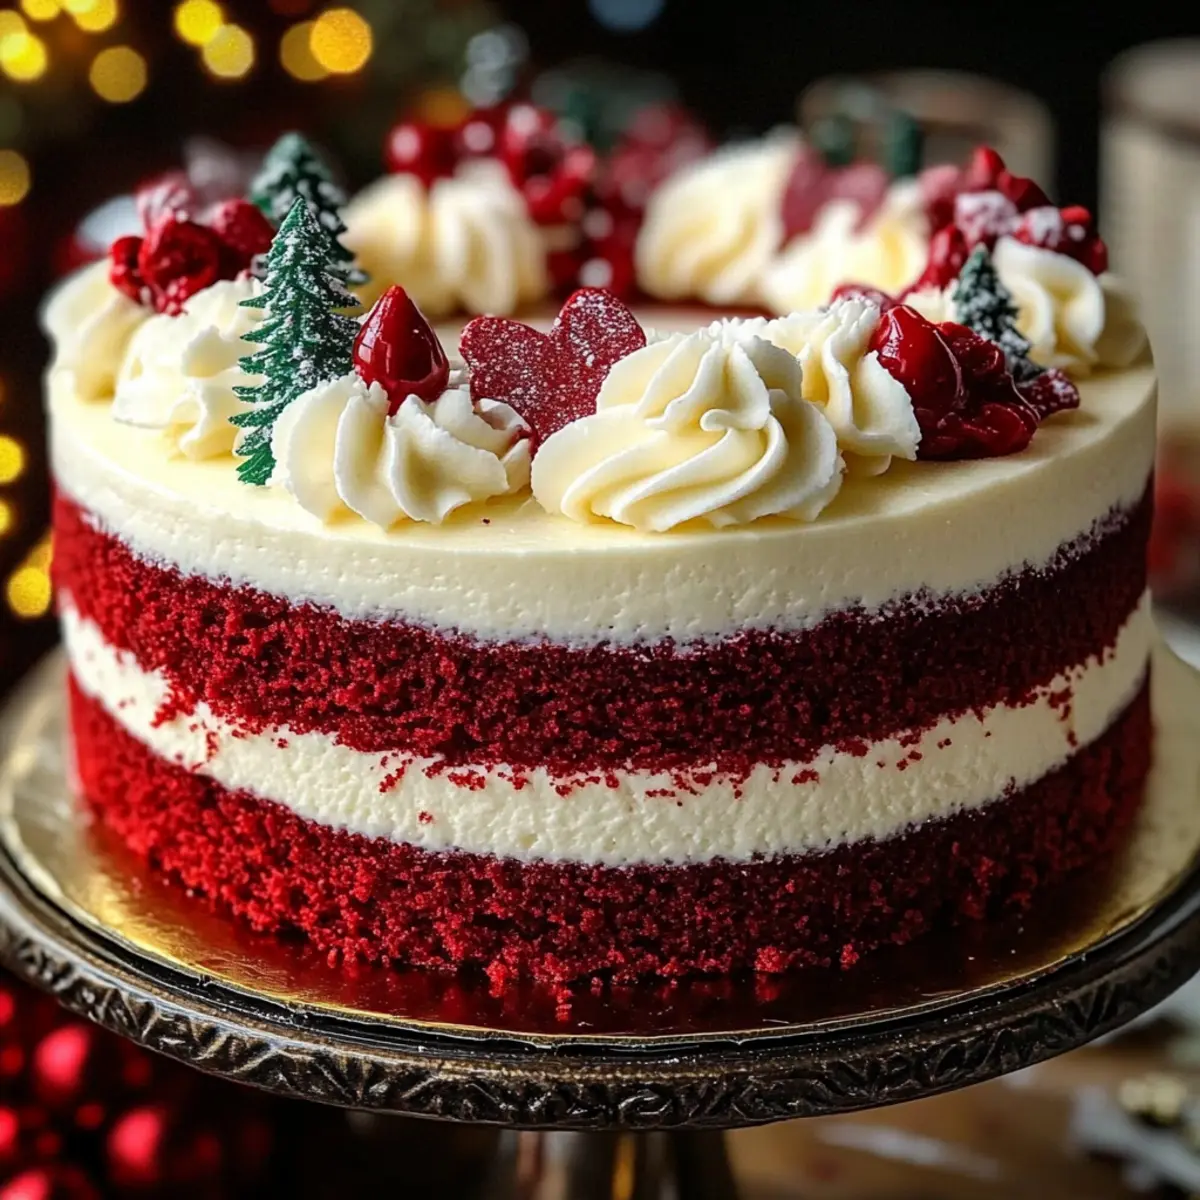
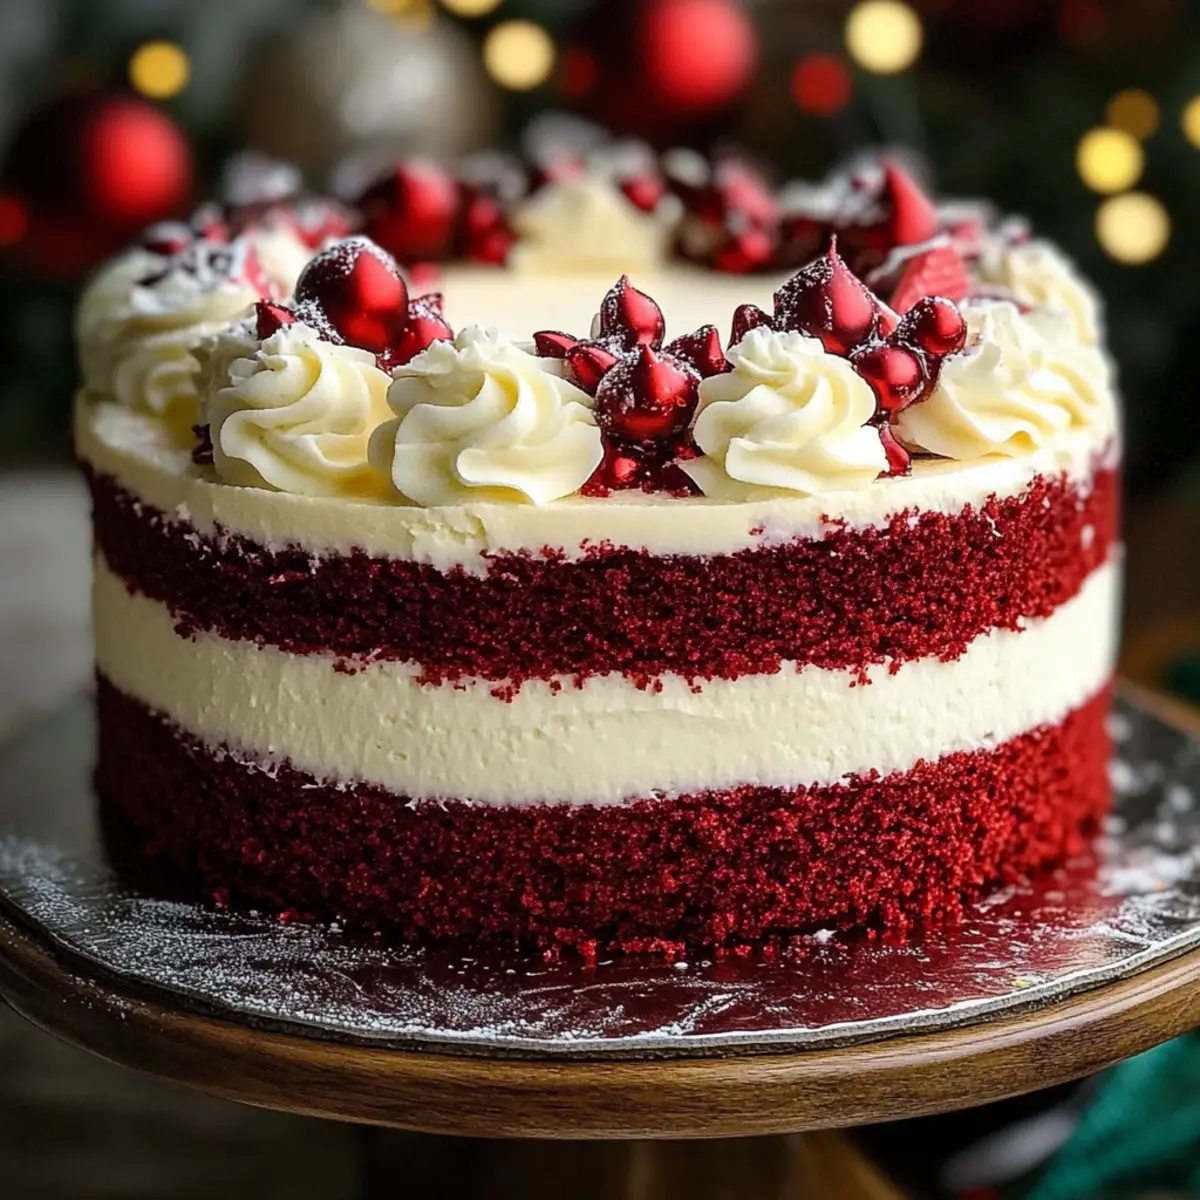
“Just wait until you see the look on their faces!” It was the kind of magic I love to hear when discussing my favorite holiday dessert: Christmas Red Velvet Cheesecake. A stunning blend of rich red velvet cake and luscious cheesecake, this festive treat is as delightful to behold as it is to taste. With its vibrant red layers and creamy white frosting, it offers both an indulgent escape from the ordinary and a gorgeous centerpiece for your holiday table. The best part? It’s surprisingly quick to whip up, allowing you more time to bask in the joy of the season instead of being tied to the kitchen. Whether you’re new to baking or a seasoned pro, this recipe is guaranteed to impress family and friends alike. So, are you ready to make this holiday season unforgettable with a show-stopping dessert that promises to steal the spotlight? Let’s dive into the magic of this Christmas Red Velvet Cheesecake!

Why is this cheesecake a holiday favorite?
Unforgettable Presentation: This Christmas Red Velvet Cheesecake is a feast for the eyes, boasting striking red and white layers that steal the spotlight on any dessert table.
Indulgent Flavors: The combination of rich red velvet and creamy cheesecake creates a luscious taste that makes it perfect for special occasions.
Time-Saving Delight: Surprisingly quick to prepare, this recipe allows you to spend less time in the kitchen and more time enjoying the festive season with loved ones.
Versatile Options: Want to jazz it up? Add a hint of peppermint extract for a seasonal twist, or even some chocolate chips for a delicious variation!
Dive into this delightful dessert and ensure your holiday gatherings are filled with joy, just like with my Red Velvet Strawberry version, or explore other festive options similar to these Chicken Alfredo Lasagna rolls!
Christmas Red Velvet Cheesecake Ingredients
For the Cake Layers
- All-Purpose Flour – Structure; can substitute with gluten-free flour mix for a gluten-free option.
- Unsweetened Cocoa Powder – Adds rich chocolate flavor; use Dutch-processed cocoa for a deeper color.
- Baking Powder – A crucial leavening agent; ensure it’s fresh for proper rise.
- Baking Soda – Provides additional leavening in the acidic environment of buttermilk.
- Salt – Balances the sweetness; use sea salt for an extra hint of flavor.
- Granulated Sugar – Sweetness; brown sugar can create a moister cake.
- Vegetable Oil – Ensures moisture and richness; melted coconut oil is a great alternative.
- Buttermilk – Adds acidity and moisture; mix regular milk with vinegar for a substitute.
- Large Eggs – Binds and provides structure; room temperature eggs incorporate better.
- Red Food Coloring – Provides vibrant color; gel food coloring maintains texture while enhancing color.
- Vanilla Extract – Enhances flavor; opt for pure extract for the best taste.
- White Vinegar – Enhances the red color and texture; lemon juice can be used as a substitute.
For the Cheesecake Layer
- Cream Cheese – The main filling base; use full-fat for a creamy texture.
- Sour Cream – Offers tanginess and moisture; Greek yogurt can be a suitable substitute.
For the Frosting
- Unsalted Butter – Provides creaminess; margarine can be used if necessary.
- Powdered Sugar – Sweetness and structure for the frosting.
With these ingredients, you’re just a whisk away from creating your stunning Christmas Red Velvet Cheesecake. Get ready to impress your guests and make this holiday season even more special!
Step‑by‑Step Instructions for Christmas Red Velvet Cheesecake
Step 1: Prepare Red Velvet Cake Layers
Begin by preheating your oven to 350°F (175°C) and greasing two 9-inch round cake pans. In a large bowl, whisk together the flour, cocoa powder, baking powder, baking soda, and salt. In another bowl, combine the granulated sugar, vegetable oil, buttermilk, eggs, red food coloring, vanilla extract, and vinegar, mixing until smooth. Gently fold the dry ingredients into the wet, being careful not to overmix. Divide the batter between the prepared pans and bake for 25-30 minutes, or until a toothpick comes out clean.
Step 2: Make the Cheesecake Layer
While your red velvet layers are cooling, prepare the cheesecake layer. In a mixing bowl, beat the cream cheese until smooth and creamy, ensuring there are no lumps. Gradually mix in the granulated sugar, sour cream, eggs, and vanilla extract until just combined. This smooth mixture will be poured over one of the cooled red velvet layers in the pan, which creates a delightful twist in your Christmas Red Velvet Cheesecake. Bake this layer for 45-50 minutes at the same temperature until it appears set yet slightly jiggly in the center.
Step 3: Assemble the Cake
Once all layers are completely cool, gently remove the red velvet cakes from their pans. Place the cheesecake layer on a serving plate or cake stand, then carefully stack the second red velvet layer on top. This creates the signature height of your Christmas Red Velvet Cheesecake. Now, it’s time to frost! Whip up a creamy buttercream frosting using unsalted butter, powdered sugar, and a splash of vanilla, then frost the top and sides generously to finish the enchanting look.
Step 4: Chill and Serve
To enhance the flavors and texture of your Christmas Red Velvet Cheesecake, refrigerate it for at least 4 hours, or ideally overnight. This chilling process allows the layers to meld beautifully together, firming up the cheesecake for easier slicing. When ready to serve, cut into pieces and present this festive delight to your guests, witnessing the joy on their faces as they dig into this gorgeous dessert!
How to Store and Freeze Christmas Red Velvet Cheesecake
Fridge: Store leftover Christmas Red Velvet Cheesecake in an airtight container for up to 5 days. This allows the flavors to meld and intensify, making each slice even more delightful.
Freezer: If you want to enjoy it later, wrap slices tightly in plastic wrap and aluminum foil before freezing. It can be stored for up to 3 months; just thaw in the fridge overnight before serving.
Reheating: For a warm treat, gently reheat cheesecake slices in the microwave for 10-15 seconds. This helps maintain that fresh, creamy texture.
Slicing Tip: When serving, use a warm knife dipped in hot water to achieve clean cuts through the luscious layers, enhancing both presentation and enjoyment.
Make Ahead Options
These Christmas Red Velvet Cheesecake layers are perfect for busy home cooks looking to save time during the festive season! You can prepare the red velvet cake layers and cheesecake filling up to 24 hours in advance. To do this, bake the cake layers as instructed and allow them to cool completely before tightly wrapping them in plastic wrap and refrigerating. For the cheesecake layer, once made, pour it over the cooled red velvet layer and cover the entire cheesecake with plastic wrap before refrigerating it overnight. This way, the flavors meld beautifully while maintaining quality. When you’re ready to serve, simply frost the cake with buttercream and let it chill for a bit longer before slicing into this show-stopping Christmas Red Velvet Cheesecake!
Expert Tips for Christmas Red Velvet Cheesecake
-
Room Temperature Ingredients: Ensure cream cheese and eggs are at room temperature for smoother mixing and to avoid lumps in the cheesecake layer.
-
Avoid Overmixing: Gently combine wet and dry ingredients; overmixing can lead to a dense cake. Remember, a light touch keeps your Christmas Red Velvet Cheesecake fluffy!
-
Proper Cooling: Allow all layers to cool completely before stacking and frosting. This prevents the frosting from melting and ensures a beautiful presentation.
-
Choose the Right Food Coloring: Opt for gel food coloring for a vibrant red without altering the texture of the cake—the richer the color, the more festive it looks!
-
Chill Before Serving: Refrigerate the assembled cheesecake for at least 4 hours or overnight. Chilling not only sets the cheesecake but intensifies the flavors, making each slice a delicious treat.
-
Experiment with Variations: Don’t hesitate to customize! Stir in chocolate chips or a splash of peppermint extract to create your unique twist on this holiday favorite.
Christmas Red Velvet Cheesecake Variations
Feel free to sprinkle your creativity into this enchanting dessert, making it uniquely yours!
-
Gluten-Free: Swap all-purpose flour with a gluten-free flour mix to accommodate gluten-sensitive guests. It’s just as delightful!
-
Chocolate Overload: Add chocolate chips to the cheesecake layer for an extra indulgent twist. The melted chocolate integrates beautifully with the creamy texture.
-
Peppermint Cream: Stir in a teaspoon of peppermint extract into the cheesecake mix for a refreshing seasonal twist that’s perfect for holiday gatherings.
-
Lighter Finish: Substitute the traditional cream cheese frosting with a whipped cream topping for a light and airy finish. This will make each slice feel like a cloud!
-
Nutty Crunch: Top your cheesecake with toasted pecans or walnuts for a delightful crunchy contrast against the smooth layers. The nuttiness enhances the overall flavor profile beautifully.
-
Caramel Drizzle: Drizzle caramel sauce over the frosted cheesecake for an added layer of sweetness and a beautiful finish. It’ll transport your taste buds to dessert heaven!
-
Spiced Up: Incorporate a dash of cinnamon or nutmeg into the cake batter for a warm, festive flavor that will have everyone begging for seconds.
-
Layers of Flavor: Think about layering in raspberry sauce between the layers for a tangy contrast that’s visually striking and delicious. The tartness pairs surprisingly well with the richness of the cheesecake.
Explore these enticing variations to create your own holiday masterpiece, ensuring that each slice spreads smiles just like in my Chicken Alfredo Lasagna or my vibrant Red Velvet Strawberry recipe!
What to Serve with Christmas Red Velvet Cheesecake
Bring warmth and delight to your holiday table with these perfect pairings that will make your meal truly memorable.
- Hot Cocoa: Rich and creamy, a cozy cup of hot cocoa complements the lush flavors of the cheesecake, making every bite more indulgent.
- Spiced Chai Latte: The warm spices of chai contrast beautifully with the sweetness of the cheesecake, adding a festive flair to your dessert spread.
- Vanilla Ice Cream: A scoop of vanilla ice cream embodies classic simplicity, enhancing the rich textures of the cake while providing a cool contrast.
- Chocolate Covered Strawberries: Juicy, tart strawberries dipped in chocolate add a fresh, vibrant touch, balancing the richness of the cheesecake delightfully.
- Festive Fruit Salad: A medley of seasonal fruits like pomegranate, oranges, and apple slices introduces a refreshing note to your meal, making it feel lighter.
- Eggnog: This creamy, spiced drink pairs wonderfully with the dessert, enhancing the holiday spirit and taste experiences all around the table.
- Peppermint Bark: These little bites add a crunchy festive sweetness, complementing the flavors while offering an extra serving of holiday cheer.
- Gingerbread Cookies: The warm spices in gingerbread resonate harmoniously with the creamy layers of the cheesecake, perfect for that cozy holiday vibe.
With these delicious accompaniments, your Christmas Red Velvet Cheesecake will shine even brighter amidst celebrations filled with love and laughter.
Christmas Red Velvet Cheesecake Recipe FAQs
What kind of red food coloring should I use?
I highly recommend using gel food coloring for the most vibrant hue. Gel food coloring provides the deep red color you want without altering the texture of the cake, ensuring a gorgeous presentation. Liquid food coloring can dilute the batter if not measured carefully, so stick with gel for the best results.
How should I store my Christmas Red Velvet Cheesecake?
Store any leftover cheesecake in an airtight container in the refrigerator for up to 5 days. The flavors can deepen as it sits, making each slice taste even more delightful with time! Just remember to keep it tightly sealed to maintain that fresh, creamy goodness.
Can I freeze Christmas Red Velvet Cheesecake?
Absolutely! If you’d like to savor it later, wrap individual slices tightly in plastic wrap followed by aluminum foil. It can comfortably freeze for up to 3 months. To enjoy, simply thaw it overnight in the refrigerator. This method preserves the rich flavors and creamy texture, making it just as delicious as fresh.
What should I do if my cheesecake layer cracks during baking?
Don’t worry if your cheesecake layer develops cracks; it happens to the best of us! To prevent this next time, ensure your cream cheese is at room temperature and avoid overmixing the batter. If it does crack, you can cover it with frosting when assembling, and it will still look amazing on the table!
Can I adjust the sweetness in the cheesecake layer?
You can absolutely adjust the sweetness based on your preference! Start by reducing the sugar in the cheesecake layer by about a quarter and taste as you go. Just keep in mind that the sweetness balances the tanginess of the cream cheese and sour cream, so a little sweetness goes a long way in enhancing the indulgent flavor of your Christmas Red Velvet Cheesecake.

Christmas Red Velvet Cheesecake: Indulge in Holiday Magic
Ingredients
Equipment
Method
- Preheat your oven to 350°F (175°C) and grease two 9-inch round cake pans. In a large bowl, whisk together the flour, cocoa powder, baking powder, baking soda, and salt. In another bowl, combine the granulated sugar, vegetable oil, buttermilk, eggs, red food coloring, vanilla extract, and vinegar, mixing until smooth. Gently fold the dry ingredients into the wet, being careful not to overmix. Divide the batter between the prepared pans and bake for 25-30 minutes, or until a toothpick comes out clean.
- While your red velvet layers are cooling, prepare the cheesecake layer. In a mixing bowl, beat the cream cheese until smooth and creamy. Gradually mix in the granulated sugar, sour cream, eggs, and vanilla extract until just combined. This smooth mixture will be poured over one of the cooled red velvet layers in the pan. Bake this layer for 45-50 minutes at the same temperature until it appears set yet slightly jiggly in the center.
- Once all layers are completely cool, gently remove the red velvet cakes from their pans. Place the cheesecake layer on a serving plate or cake stand, then carefully stack the second red velvet layer on top. Frost with a creamy buttercream frosting using unsalted butter, powdered sugar, and a splash of vanilla to finish the enchanting look.
- Refrigerate the assembled cheesecake for at least 4 hours, or ideally overnight. When ready to serve, cut into pieces and present this festive delight to your guests.
Leave a Reply