
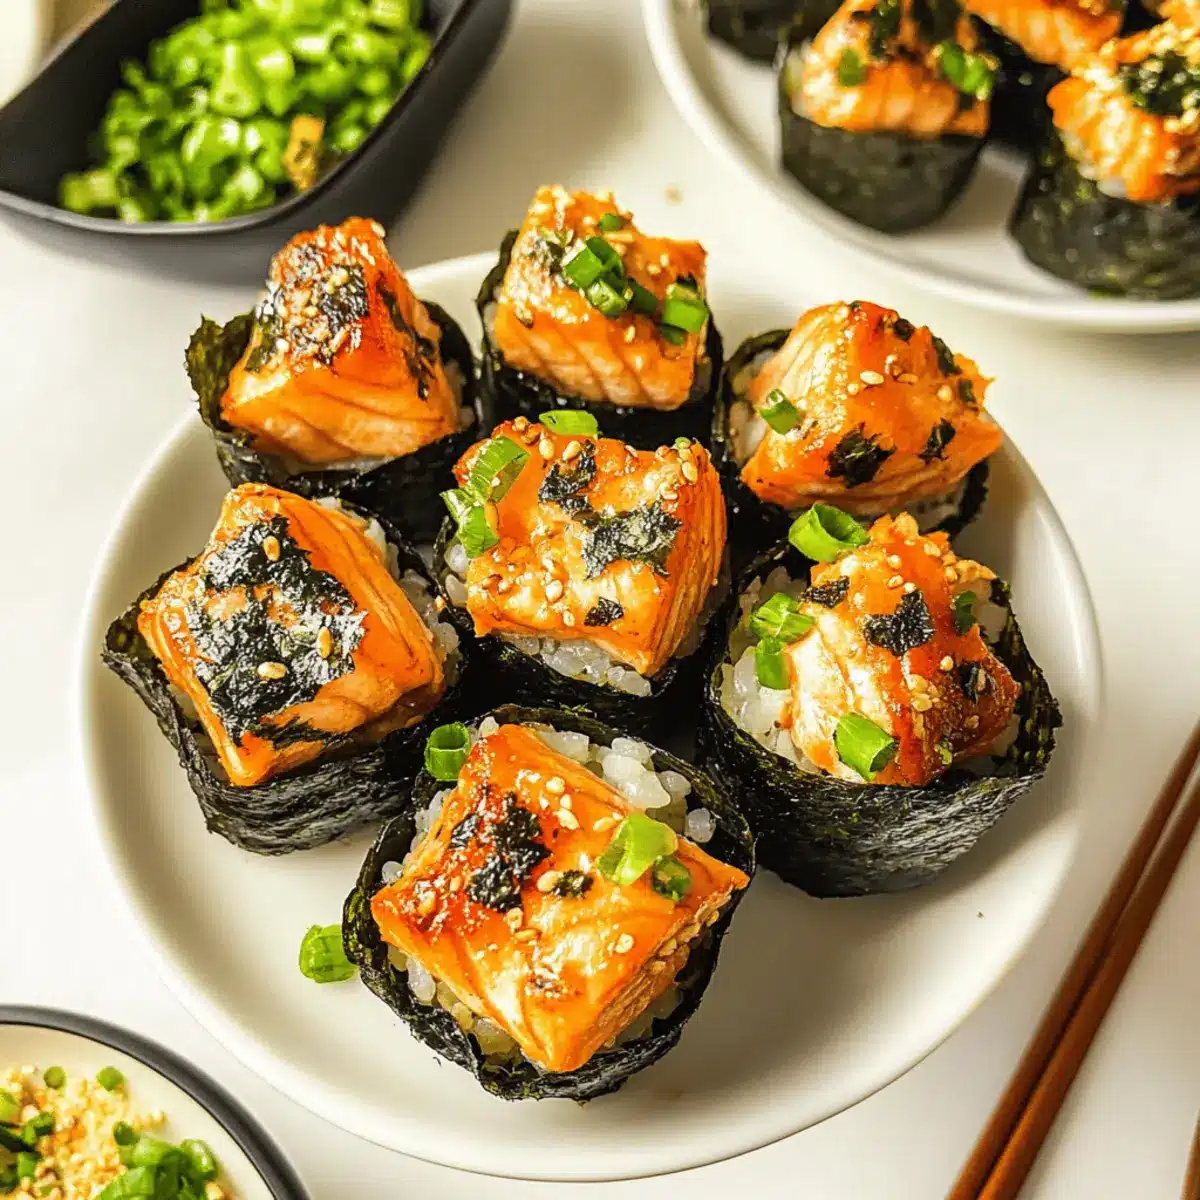
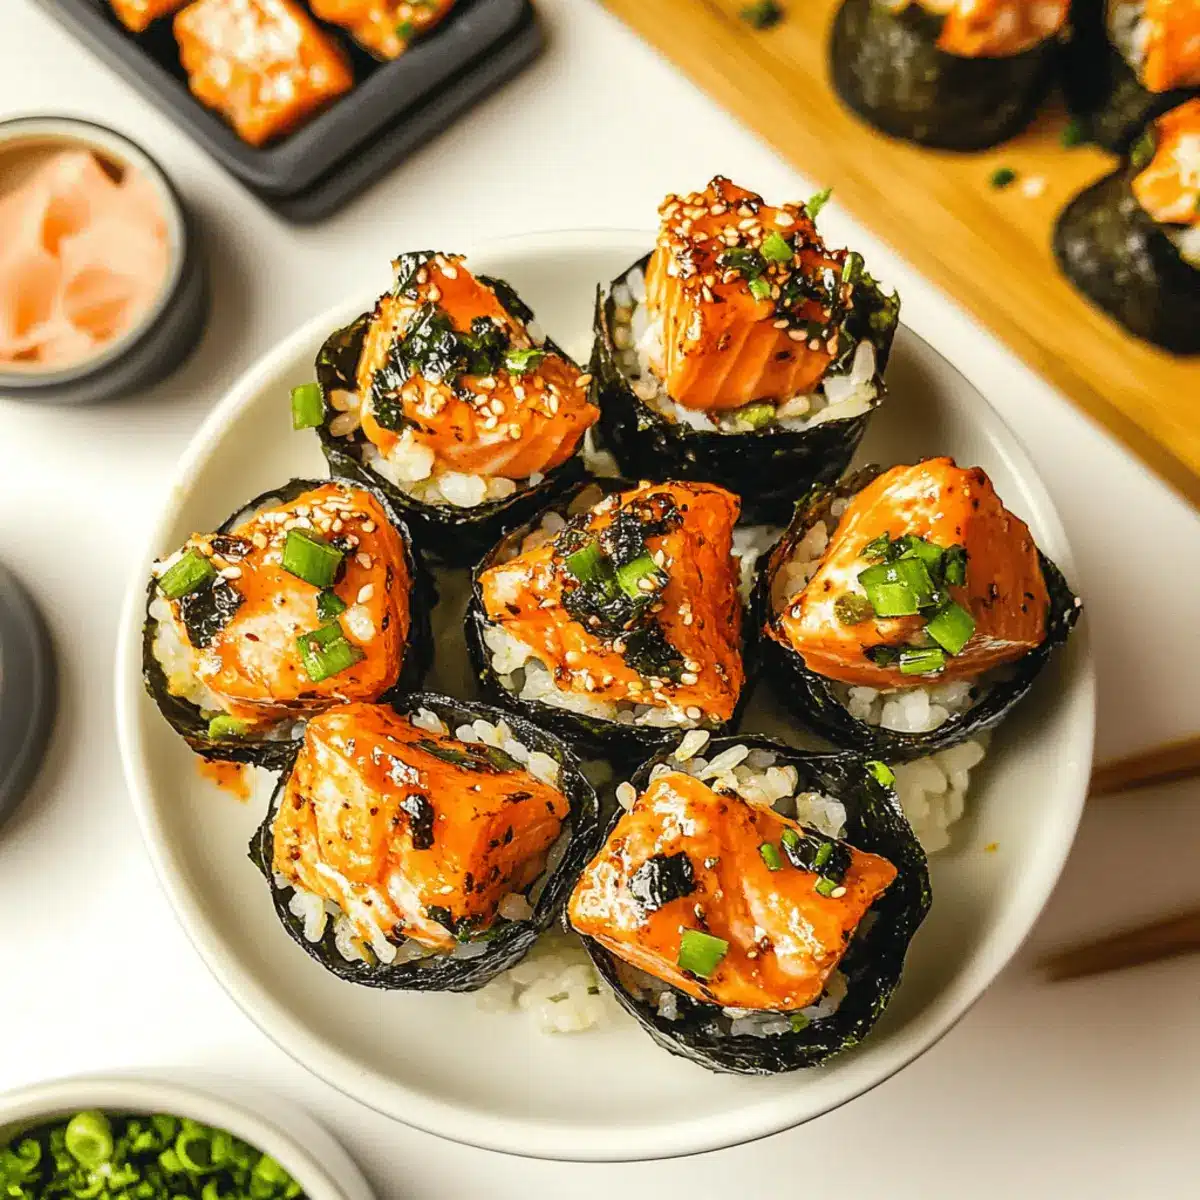
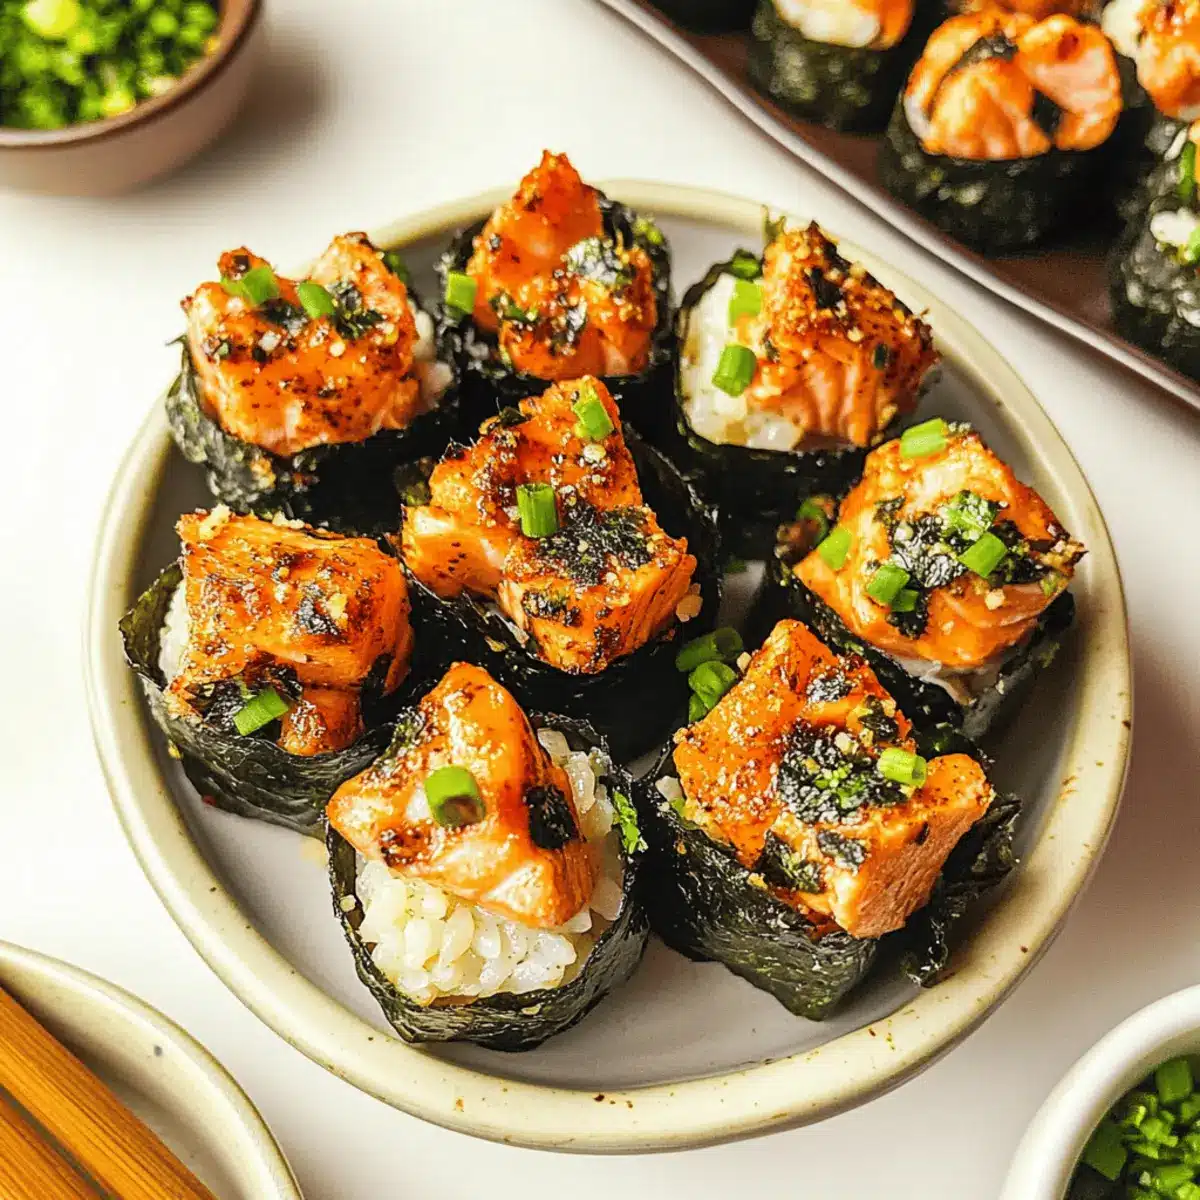
While snacking on sushi, I marvel at the artisanal craftsmanship behind every roll. But what if you could enjoy that handmade perfection without the hours spent rolling? Enter these Easy Baked Salmon Sushi Cups—a delightful twist on traditional sushi that packs all the flavor into a bite-sized format! With perfectly tender salmon nestled in fluffy sushi rice and crispy nori, this recipe is a game-changer for quick entertaining and gives you a warm, cozy experience reminiscent of your favorite sushi spot. In just 30 minutes, you can whip up an irresistible appetizer that is sure to impress your guests or satisfy your sushi cravings at home. Curious to see how easy it is to create these crisp, savory cups? Let’s dive into the recipe!
Why You’ll Love These Sushi Cups
Simplicity at Its Best: This recipe requires minimal prep and cooking skills, making it perfect for both novice cooks and seasoned chefs.
Irresistible Flavor Fusion: Combining tender salmon and creamy Kewpie mayo with sushi rice creates a taste explosion you won’t be able to resist.
Crowd-Pleasing Appetizer: Serve these sushi cups at gatherings, and watch them disappear! Guests will love the unique twist on traditional sushi.
Quick and Easy: Ready in just 30 minutes, these cups satisfy your sushi cravings without the time commitment of rolling sushi.
Endless Customization: Feel free to swap salmon for tuna or crab, or add your favorite veggies like avocado or cucumber for added freshness. If you’re looking for more delightful appetizers, check out these delicious Baked Parmesan Zucchini and Baked Cauliflower Steaks for delightful inspiration!
Baked Salmon Sushi Cups Ingredients
• Create delicious Baked Salmon Sushi Cups with these key ingredients to ensure maximum flavor and satisfaction.
For the Salmon Mixture
- Salmon – Provides rich protein and umami flavor. Fresh or frozen salmon can be used.
- Light Soy Sauce – Adds saltiness and depth. Dark soy sauce can be substituted for a stronger flavor.
- Kewpie Mayo – Creamy texture with a sweetness that complements the heat. Regular mayo can be a substitute, although the taste will vary.
- Sriracha – Brings spice and heat. Adjust the amount based on personal preference or substitute with another hot sauce.
- Sesame Oil – Adds nuttiness and fragrance. Can be replaced with a neutral oil in a pinch.
For the Sushi Rice
- Sushi Rice – Provides sticky texture to hold the cups together. Can substitute with jasmine rice, though the texture will differ.
- Rice Vinegar – Used to season cooked rice. Apple cider vinegar can be a substitute, but flavor may vary.
- White Sugar – Sweetens the rice. Can be replaced with honey or another sweetener in small amounts.
For the Cups
- Nori Sheets – Forms the cups’ structure and adds a sea flavor. Other seaweed can be used if nori is unavailable.
- Cooking Spray – Prevents sticking in the muffin tin.
For Garnishing
- Furikake – Garnish that adds flavor and texture. Optional but recommended for an authentic touch.
- Green Onion – Freshness and crunch. Can be omitted or replaced with chives.
Step‑by‑Step Instructions for Baked Salmon Sushi Cups
Step 1: Prepare Sushi Rice
Begin by rinsing 1 cup of sushi rice under cold water until the water runs clear. Cook the rice according to package instructions, typically simmering in 1 ¼ cups of water for about 15 minutes. Once cooked, remove from heat and let it sit covered for an additional 10 minutes. Then, gently mix the rice with 2 tablespoons of rice vinegar and 1 tablespoon of white sugar to season.
Step 2: Prepare Salmon Mixture
While the sushi rice cools, cut 8 ounces of salmon into small cubes. In a mixing bowl, combine the cubed salmon with 2 tablespoons of light soy sauce, 2 tablespoons of Kewpie mayo, 1 tablespoon of sriracha, and 1 teaspoon of sesame oil. Stir gently until just combined to maintain the salmon’s texture, and set the mixture aside for the flavors to meld.
Step 3: Preheat Oven
Next, preheat your oven to 400°F (200°C). This ensures a hot environment for baking the Baked Salmon Sushi Cups, allowing the salmon to cook evenly and the tops to achieve a golden color. As the oven warms up, prepare your muffin tin by spraying it generously with cooking spray to prevent sticking.
Step 4: Assemble Cups
Cut 4 nori sheets into squares that can fit into the muffin tin’s cups. Press about 2 tablespoons of the seasoned sushi rice into each cup, forming a small base. Spoon a generous amount of the salmon mixture on top of the rice, filling each cup but ensuring it doesn’t overflow. The structure will hold the delicious filling together during baking.
Step 5: Bake
Place the muffin tin in the preheated oven and bake the cups for 15 minutes. You’ll know they’re done when the salmon is cooked through and the tops of the cups are slightly golden and aromatic. Keep an eye on them to prevent over-baking, as you want a tender yet firm sushi cup.
Step 6: Garnish & Serve
Once baked, remove the cups from the oven and allow them to cool for a minute. Drizzle with additional sriracha or Kewpie mayo if desired. Sprinkle furikake on top for added flavor and then garnish with finely chopped green onions. Serve these Baked Salmon Sushi Cups warm and watch them become a favorite at your gathering!
Storage Tips for Baked Salmon Sushi Cups
Fridge: Store leftovers in an airtight container for up to 2–3 days to maintain freshness. The Baked Salmon Sushi Cups are best enjoyed within this timeframe.
Freezer: If you want to keep them longer, freeze the uncooked cups before baking. Wrap in plastic and store in the freezer for up to 3 months.
Reheating: To enjoy your leftover sushi cups, reheat in a preheated oven at 350°F (175°C) for about 10 minutes, ensuring they are heated through and maintain their crispy texture.
Avoid Moisture: When storing in the fridge, place a paper towel in the container to absorb excess moisture, keeping your Baked Salmon Sushi Cups crisp.
Make Ahead Options
These Easy Baked Salmon Sushi Cups are perfect for meal prep enthusiasts! You can prepare the sushi rice and salmon mixture up to 24 hours in advance. Simply cook the sushi rice, mix it with rice vinegar and sugar, then refrigerate in an airtight container. For the salmon mixture, cube the salmon and combine it with the soy sauce, Kewpie mayo, sriracha, and sesame oil, storing it in a separate airtight container in the fridge. When you’re ready to bake, just assemble the cups with the nori and top with the chilled salmon mixture, then bake as directed for a dish that’s just as delicious as when made fresh! Enjoy stress-free entertaining with these fantastic Baked Salmon Sushi Cups, ready to impress with minimal effort.
Expert Tips for Baked Salmon Sushi Cups
-
Texture Matters: Don’t overmix the salmon mixture to ensure it maintains a nice texture. A gentle fold is all you need for a delightful bite!
-
Snug Fit: Make sure the nori sheets fit snugly in the muffin tin to prevent any spillage during baking. This helps keep your Baked Salmon Sushi Cups intact.
-
Cooling Time: Allow the cups to cool slightly after baking, as they retain heat. This makes them easier to handle and enhances the overall eating experience.
-
Garnish Wisely: For a pop of flavor, don’t skip the furikake and green onions! They elevate the taste and add lovely visual appeal to your Baked Salmon Sushi Cups.
-
Experiment with Fillings: Feel free to swap salmon for tuna or crab for a different flavor profile. Mixing in fresh veggies can also add an extra crunch and freshness!
What to Serve with Easy Baked Salmon Sushi Cups
Picture a table set for an evening of laughter and warmth, where each bite bursts with flavor and comfort.
- Pickled Ginger: Adds a zesty kick that complements the flavors of the sushi cups and cleanses the palate beautifully.
- Soy Sauce: A drizzle brings the familiar umami richness to your sushi experience, enhancing the overall savory notes.
- Cucumber Salad: Refreshing and crisp, this salad offers a crunchy contrast to the warm, tender sushi cups and balances the richness of salmon.
- Miso Soup: A warm bowl of light miso soup perfectly pairs with these sushi cups, providing a comforting, earthy balance to the meal.
- Sushi Rolls: Serve alongside classic veggie or California rolls for an additional fusion of flavors and a complete sushi feast.
- Sparkling Water with Lime: This refreshing drink cuts through the savory richness, offering a burst of citrus that cleanses the palate.
- Green Tea: A warm cup of green tea complements the sushi cups while enhancing the meal’s Japanese-inspired theme.
- Fruit Sorbet: For a light dessert, a scoop of fruity sorbet cleanses the palate and provides a refreshing finish after the savory bites.
These pairings will create an unforgettable dining experience, whether it’s a casual night in or a special occasion with friends and family.
Baked Salmon Sushi Cups: Fun Variations
Feel free to let your culinary creativity shine with these tempting adaptations to elevate your sushi cups!
-
Tuna Swap: Replace salmon with fresh tuna for a lighter, yet equally delicious take on your sushi cups. It’s a delightful alternative that brings a different flavor profile to each bite.
-
Crab Variation: Use crab meat in place of salmon for a classic crab salad twist. Simply mix with mayo and your choice of seasonings for a refreshing change.
-
Vegetable Boost: Add sliced avocado or crunchy cucumber to the salmon mixture for a fresh and vibrant flavor. This will not only enhance the taste but add a lovely texture to your sushi cups.
-
Spicy Mayo Drizzle: Swap the Kewpie mayo for a spicy mayo blend by mixing it with more sriracha for those who crave an extra kick. It’s a simple twist that packs a punch!
-
Teriyaki Twist: Try using teriyaki sauce instead of soy sauce for a sweet, savory glaze that adds depth to your cups. The sweet flavor complements the savory salmon beautifully.
-
Jasmine Rice Alternative: If you want a lighter rice option, jasmine rice is a perfect substitute, providing a fragrant yet subtle flavor. It helps keep the texture light and fluffy.
-
Crunchy Topping: Top your cups with panko breadcrumbs before baking for an added crunch. This creates a delightful contrast between crispy and creamy!
-
Cilantro Infusion: If you’re feeling adventurous, mix in some fresh chopped cilantro for a herby surprise. This accentuates the fresh flavors and makes your sushi cups unforgettable.
Whether you opt for striking flavors like Baked Cauliflower Steaks or want to enhance your meal with Cinnamon Oatmeal Cups, the possibilities are endless! Enjoy experimenting as you make this dish your own!
Baked Salmon Sushi Cups Recipe FAQs
How can I select the right salmon for my sushi cups?
Absolutely! Look for fresh, vibrant salmon with a firm texture. If using frozen salmon, ensure it’s fully thawed and free of ice crystals. When buying, check for a bright orange color without any dark spots on the fillet, which indicates freshness.
How should I store leftover Baked Salmon Sushi Cups?
To maintain their deliciousness, store leftovers in an airtight container in the refrigerator for up to 2–3 days. It’s best to enjoy them fresh, but they can last a little longer if stored properly like this.
Can I freeze Baked Salmon Sushi Cups?
Yes! I recommend freezing the uncooked sushi cups for optimal freshness. Wrap individual cups tightly in plastic wrap and place them in an airtight container or freezer bag. They can be stored in the freezer for up to 3 months. When you’re ready to enjoy them, bake directly from frozen, adding a few extra minutes to the cooking time.
What should I do if my sushi rice turns out too sticky or dry?
Very! If the rice is too sticky, make sure you’re rinsing it well before cooking to remove excess starch. For dry rice, try adding a dash of water during the cooking process next time. When seasoning, mix gently to avoid breaking the grains.
Can I make these sushi cups gluten-free?
Definitely! You can use gluten-free soy sauce or tamari instead of regular soy sauce. Ensure all other ingredients, like mayo and rice vinegar, are also gluten-free to keep your Baked Salmon Sushi Cups safe for those with gluten sensitivities.
Are there any ingredient alternatives for allergies?
For sure! If you’re dealing with allergies, feel free to swap out the regular mayonnaise for a vegan or allergen-free version. For a plant-based option, consider using chickpea salad in place of salmon. You can also customize the veggies to suit personal preferences, ensuring everyone can enjoy these tasty cups!

Baked Salmon Sushi Cups: Easy, Warm, and Irresistibly Savory
Ingredients
Equipment
Method
- Rinse sushi rice under cold water until clear. Cook according to package instructions with 1 ¼ cups of water for about 15 minutes. Let sit covered for an additional 10 minutes. Mix in rice vinegar and sugar.
- Cut salmon into small cubes. Combine salmon with soy sauce, Kewpie mayo, sriracha, and sesame oil in a mixing bowl. Stir gently and set aside.
- Preheat oven to 400°F (200°C). Spray muffin tin with cooking spray to prevent sticking.
- Cut nori sheets into squares and press 2 tablespoons of sushi rice into each muffin tin cup. Spoon salmon mixture on top.
- Bake for 15 minutes until salmon is cooked through and tops are golden.
- Remove from oven, cool for a minute, garnish with sriracha, furikake, and green onions. Serve warm.
Leave a Reply